Getting Started with ScalarDB Cluster
This tutorial describes how to create a sample application that uses ScalarDB Cluster through the Java API.
Overview
This tutorial illustrates the process of creating a sample e-commerce application, where items can be ordered and paid for with a line of credit by using ScalarDB.
Since the focus of the sample application is to demonstrate using ScalarDB, application-specific error handling, authentication processing, and similar functions are not included in the sample application. For details about exception handling in ScalarDB, see Handle exceptions.
The following diagram shows the system architecture of the sample application:
What you can do in this sample application
The sample application supports the following types of transactions:
- Get customer information.
- Place an order by using a line of credit.
- Checks if the cost of the order is below the customer's credit limit.
- If the check passes, records the order history and updates the amount the customer has spent.
- Get order information by order ID.
- Get order information by customer ID.
- Make a payment.
- Reduces the amount the customer has spent.
Prerequisites for this sample application
- One of the following Java Development Kits (JDKs):
- Oracle JDK 8
- OpenJDK 8 from Eclipse Temurin, Amazon Corretto, or Microsoft
- ScalarDB Cluster running on a Kubernetes cluster
- If you don't have ScalarDB Cluster set up, please follow the instructions in Set Up ScalarDB Cluster on Kubernetes by Using a Helm Chart.
This sample application only works with Java 8. However, ScalarDB itself works with Java LTS versions, which means that you can use Java LTS versions for your application that uses ScalarDB. For details on the requirements of ScalarDB, such as which Java versions can be used, see Requirements.
In addition, you need access to the ScalarDB Cluster GitHub repository and the packages in the ScalarDB Cluster repository, which are private. The packages and repository are available only those who are using ScalarDB Enterprise. If you need a license for ScalarDB Enterprise, please contact us.
After confirming that you have access to the ScalarDB SQL repository and its packages, you will need to set your GitHub username and your personal access token. To specify these properties, you can do one of the following:
Specify the properties with the -P option by running the ./gradlew command as follows, replacing <YOUR_GITHUB_USERNAME> with your GitHub username and <YOUR_PERSONAL_ACCESS_TOKEN> with your personal access token:
./gradlew run ... -Pgpr.user=<YOUR_GITHUB_USERNAME> -Pgpr.key=<YOUR_PERSONAL_ACCESS_TOKEN>
Specify the properties as environment variables by running the following commands, replacing <YOUR_GITHUB_USERNAME> with your GitHub username and <YOUR_PERSONAL_ACCESS_TOKEN> with your personal access token:
export USERNAME=<YOUR_GITHUB_USERNAME>
export TOKEN=<YOUR_PERSONAL_ACCESS_TOKEN>
For more details, see Developer Guide for ScalarDB Cluster with the Java API.
Set up ScalarDB Cluster
The following sections describe how to set up the sample e-commerce application.
Clone the ScalarDB samples repository
Open Terminal, then clone the ScalarDB samples repository by running the following command:
git clone https://github.com/scalar-labs/scalardb-samples
Then, go to the directory that contains the sample application by running the following command:
cd scalardb-samples/scalardb-sample
Modify build.gradle
To use ScalarDB Cluster, open build.gradle in your preferred text editor. Then, add the following repository for ScalarDB Cluster to the repositories section:
repositories {
    ...

    maven {
        url = uri("https://maven.pkg.github.com/scalar-labs/scalardb-cluster")
        credentials {
            username = project.findProperty("gpr.user") ?: System.getenv("USERNAME")
            password = project.findProperty("gpr.key") ?: System.getenv("TOKEN")
        }
    }
}
Then, delete the existing dependency for com.scalar-labs:scalardb from the dependencies section, and add the following dependency to the dependencies section:
dependencies {
    ...

    implementation 'com.scalar-labs:scalardb-cluster-client:3.9.7'
}
Modify database.properties
You need to modify database.properties to connect to ScalarDB Cluster as well. But before doing so, you need to get the EXTERNAL-IP address of the Envoy service resource (scalardb-cluster-envoy). To get the service resource, run the following command:
kubectl get svc scalardb-cluster-envoy
You should see a similar output as below, with different values for CLUSTER-IP, PORT(S), and AGE:
NAME                     TYPE           CLUSTER-IP      EXTERNAL-IP   PORT(S)           AGE
scalardb-cluster-envoy   LoadBalancer   10.105.121.51   localhost     60053:30641/TCP   16h
In this case, the EXTERNAL-IP address is localhost.
In database.properties, you need to specify cluster for the scalar.db.transaction_manager property and use indirect as the client mode for scalar.db.contact_points to connect to the Envoy service resource.
Open database.properties by running the following command:
vim database.properties
Then, modify database.properties as follows:
scalar.db.transaction_manager=cluster
scalar.db.contact_points=indirect:localhost
For details about the client modes, see Developer Guide for ScalarDB Cluster with the Java API.
Load the schema
The database schema (the method in which the data will be organized) for the sample application has already been defined in schema.json.
To apply the schema, go to ScalarDB Releases and download the ScalarDB Cluster Schema Loader to the scalardb-samples/scalardb-sample folder.
Then, run the following command:
java -jar scalardb-cluster-schema-loader-3.9.7-all.jar --config database.properties -f schema.json --coordinator
Schema details
As shown in schema.json for the sample application, all the tables are created in the sample namespace.
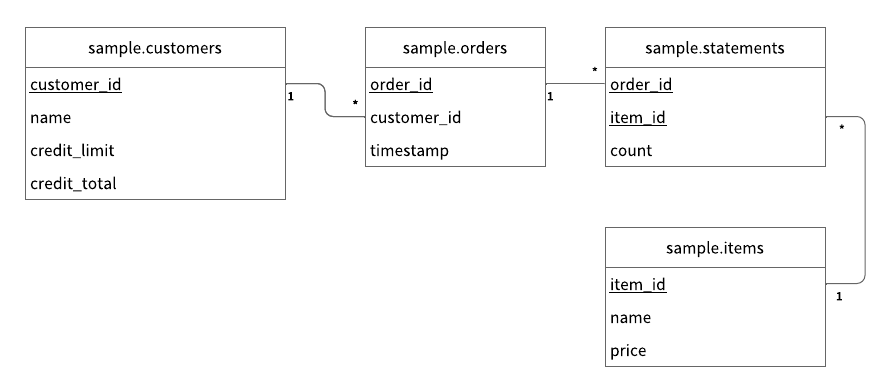
sample.customers: a table that manages customer informationcredit_limit: the maximum amount of money that the lender will allow the customer to spend from their line of creditcredit_total: the amount of money that the customer has spent from their line of credit
sample.orders: a table that manages order informationsample.statements: a table that manages order statement informationsample.items: a table that manages information for items to be ordered
The Entity Relationship Diagram for the schema is as follows:
Load the initial data
Before running the sample application, you need to load the initial data by running the following command:
./gradlew run --args="LoadInitialData"
After the initial data has loaded, the following records should be stored in the tables.
sample.customers table
| customer_id | name | credit_limit | credit_total |
|---|---|---|---|
| 1 | Yamada Taro | 10000 | 0 |
| 2 | Yamada Hanako | 10000 | 0 |
| 3 | Suzuki Ichiro | 10000 | 0 |
sample.items table
| item_id | name | price |
|---|---|---|
| 1 | Apple | 1000 |
| 2 | Orange | 2000 |
| 3 | Grape | 2500 |
| 4 | Mango | 5000 |
| 5 | Melon | 3000 |
Execute transactions and retrieve data in the sample application
The following sections describe how to execute transactions and retrieve data in the sample e-commerce application.
Get customer information
Start with getting information about the customer whose ID is 1 by running the following command:
./gradlew run --args="GetCustomerInfo 1"
You should see the following output:
...
{"id": 1, "name": "Yamada Taro", "credit_limit": 10000, "credit_total": 0}
...
Place an order
Then, have customer ID 1 place an order for three apples and two oranges by running the following command:
The order format in this command is ./gradlew run --args="PlaceOrder <CUSTOMER_ID> <ITEM_ID>:<COUNT>,<ITEM_ID>:<COUNT>,...".
./gradlew run --args="PlaceOrder 1 1:3,2:2"
You should see a similar output as below, with a different UUID for order_id, which confirms that the order was successful:
...
{"order_id": "dea4964a-ff50-4ecf-9201-027981a1566e"}
...
Check order details
Check details about the order by running the following command, replacing <ORDER_ID_UUID> with the UUID for the order_id that was shown after running the previous command:
./gradlew run --args="GetOrder <ORDER_ID_UUID>"
You should see a similar output as below, with different UUIDs for order_id and timestamp:
...
{"order": {"order_id": "dea4964a-ff50-4ecf-9201-027981a1566e","timestamp": 1650948340914,"customer_id": 1,"customer_name": "Yamada Taro","statement": [{"item_id": 1,"item_name": "Apple","price": 1000,"count": 3,"total": 3000},{"item_id": 2,"item_name": "Orange","price": 2000,"count": 2,"total": 4000}],"total": 7000}}
...
Place another order
Place an order for one melon that uses the remaining amount in credit_total for customer ID 1 by running the following command:
./gradlew run --args="PlaceOrder 1 5:1"
You should see a similar output as below, with a different UUID for order_id, which confirms that the order was successful:
...
{"order_id": "bcc34150-91fa-4bea-83db-d2dbe6f0f30d"}
...
Check order history
Get the history of all orders for customer ID 1 by running the following command:
./gradlew run --args="GetOrders 1"
You should see a similar output as below, with different UUIDs for order_id and timestamp, which shows the history of all orders for customer ID 1 in descending order by timestamp:
...
{"order": [{"order_id": "dea4964a-ff50-4ecf-9201-027981a1566e","timestamp": 1650948340914,"customer_id": 1,"customer_name": "Yamada Taro","statement": [{"item_id": 1,"item_name": "Apple","price": 1000,"count": 3,"total": 3000},{"item_id": 2,"item_name": "Orange","price": 2000,"count": 2,"total": 4000}],"total": 7000},{"order_id": "bcc34150-91fa-4bea-83db-d2dbe6f0f30d","timestamp": 1650948412766,"customer_id": 1,"customer_name": "Yamada Taro","statement": [{"item_id": 5,"item_name": "Melon","price": 3000,"count": 1,"total": 3000}],"total": 3000}]}
...
Check credit total
Get the credit total for customer ID 1 by running the following command:
./gradlew run --args="GetCustomerInfo 1"
You should see the following output, which shows that customer ID 1 has reached their credit_limit in credit_total and cannot place anymore orders:
...
{"id": 1, "name": "Yamada Taro", "credit_limit": 10000, "credit_total": 10000}
...
Try to place an order for one grape and one mango by running the following command:
./gradlew run --args="PlaceOrder 1 3:1,4:1"
You should see the following output, which shows that the order failed because the credit_total amount would exceed the credit_limit amount.
...
java.lang.RuntimeException: Credit limit exceeded
        at sample.Sample.placeOrder(Sample.java:205)
        at sample.command.PlaceOrderCommand.call(PlaceOrderCommand.java:33)
        at sample.command.PlaceOrderCommand.call(PlaceOrderCommand.java:8)
        at picocli.CommandLine.executeUserObject(CommandLine.java:1783)
        at picocli.CommandLine.access$900(CommandLine.java:145)
        at picocli.CommandLine$RunLast.handle(CommandLine.java:2141)
        at picocli.CommandLine$RunLast.handle(CommandLine.java:2108)
        at picocli.CommandLine$AbstractParseResultHandler.execute(CommandLine.java:1975)
        at picocli.CommandLine.execute(CommandLine.java:1904)
        at sample.command.SampleCommand.main(SampleCommand.java:35)
...
Make a payment
To continue making orders, customer ID 1 must make a payment to reduce the credit_total amount.
Make a payment by running the following command:
./gradlew run --args="Repayment 1 8000"
Then, check the credit_total amount for customer ID 1 by running the following command:
./gradlew run --args="GetCustomerInfo 1"
You should see the following output, which shows that a payment was applied to customer ID 1, reducing the credit_total amount:
...
{"id": 1, "name": "Yamada Taro", "credit_limit": 10000, "credit_total": 2000}
...
Now that customer ID 1 has made a payment, place an order for one grape and one melon by running the following command:
./gradlew run --args="PlaceOrder 1 3:1,4:1"
You should see a similar output as below, with a different UUID for order_id, which confirms that the order was successful:
...
{"order_id": "8911cab3-1c2b-4322-9386-adb1c024e078"}
...
See also
For other ScalarDB Cluster tutorials, see the following:
- Getting Started with ScalarDB Cluster GraphQL
- Getting Started with ScalarDB Cluster SQL via JDBC
- Getting Started with ScalarDB Cluster SQL via Spring Data JDBC for ScalarDB
- Getting Started with Using Go for ScalarDB Cluster
- Getting Started with Using Python for ScalarDB Cluster
For details about developing applications that use ScalarDB Cluster with the Java API, refer to the following:
For details about the ScalarDB Cluster gRPC API, refer to the following: