Getting Started with ScalarDB
This getting started tutorial explains how to configure your preferred database in ScalarDB and illustrates the process of creating a sample e-commerce application, where items can be ordered and paid for with a credit card by using ScalarDB. The sample e-commerce application shows how users can order and pay for items by using a line of credit.
Since the focus of the sample application is to demonstrate using ScalarDB, application-specific error handling, authentication processing, and similar functions are not included in the sample application. For details about exception handling in ScalarDB, see How to handle exceptions.
Prerequisites for this sample application
- One of the following Java Development Kits (JDKs):
- Oracle JDK: 8, 11, 17, or 21 (LTS versions)
- OpenJDK distribution (Eclipse Temurin, Amazon Corretto, or Microsoft Build of OpenJDK): 8, 11, 17, or 21 (LTS versions)
- Docker 20.10 or later with Docker Compose V2 or later
Clone the ScalarDB samples repository
Open Terminal, then clone the ScalarDB samples repository by running the following command:
git clone https://github.com/scalar-labs/scalardb-samples
Then, go to the directory that contains the sample application by running the following command:
cd scalardb-samples/scalardb-sample
Set up your database for ScalarDB
Follow the instructions below to configure your database for ScalarDB.
For a list of databases that ScalarDB supports, see Databases.
- Relational databases
- NewSQL databases
- NoSQL databases
Select your relational database.
- Db2
- MariaDB
- MySQL
- Oracle Database
- PostgreSQL
- SQL Server
- SQLite
Run Db2 locally
You can run IBM Db2 in Docker Compose by using the docker-compose.yml file in the scalardb-samples/scalardb-sample directory.
To start IBM Db2, run the following command:
docker compose up -d db2
Configure ScalarDB
The database.properties file in the scalardb-samples/scalardb-sample directory contains database configurations. Please uncomment the properties for Db2 in the database.properties file so that the configuration looks as follows:
# For Db2
scalar.db.storage=jdbc
scalar.db.contact_points=jdbc:db2://localhost:50000/sample
scalar.db.username=db2inst1
scalar.db.password=db2inst1
Run MariaDB locally
You can run MariaDB in Docker Compose by using the docker-compose.yml file in the scalardb-samples/scalardb-sample directory.
To start MariaDB, run the following command:
docker compose up -d mariadb
Configure ScalarDB
The database.properties file in the scalardb-samples/scalardb-sample directory contains database configurations. Please uncomment the properties for MariaDB in the database.properties file so that the configuration looks as follows:
# For MariaDB
scalar.db.storage=jdbc
scalar.db.contact_points=jdbc:mariadb://localhost:3306
scalar.db.username=root
scalar.db.password=mariadb
Run MySQL locally
You can run MySQL in Docker Compose by using the docker-compose.yml file in the scalardb-samples/scalardb-sample directory.
To start MySQL, run the following command:
docker compose up -d mysql
Configure ScalarDB
The database.properties file in the scalardb-samples/scalardb-sample directory contains database configurations. Please uncomment the properties for MySQL in the database.properties file so that the configuration looks as follows:
# For MySQL
scalar.db.storage=jdbc
scalar.db.contact_points=jdbc:mysql://localhost:3306/
scalar.db.username=root
scalar.db.password=mysql
Run Oracle Database locally
You can run Oracle Database in Docker Compose by using the docker-compose.yml file in the scalardb-samples/scalardb-sample directory.
To start Oracle Database, run the following command:
docker compose up -d oracle
Configure ScalarDB
The database.properties file in the scalardb-samples/scalardb-sample directory contains database configurations. Please uncomment the properties for Oracle Database in the database.properties file so that the configuration looks as follows:
# For Oracle
scalar.db.storage=jdbc
scalar.db.contact_points=jdbc:oracle:thin:@//localhost:1521/FREEPDB1
scalar.db.username=SYSTEM
scalar.db.password=Oracle
Run PostgreSQL locally
You can run PostgreSQL in Docker Compose by using the docker-compose.yml file in the scalardb-samples/scalardb-sample directory.
To start PostgreSQL, run the following command:
docker compose up -d postgres
Configure ScalarDB
The database.properties file in the scalardb-samples/scalardb-sample directory contains database configurations. Please uncomment the properties for PostgreSQL in the database.properties file so that the configuration looks as follows:
# For PostgreSQL
scalar.db.storage=jdbc
scalar.db.contact_points=jdbc:postgresql://localhost:5432/
scalar.db.username=postgres
scalar.db.password=postgres
Run SQL Server locally
You can run SQL Server in Docker Compose by using the docker-compose.yml file in the scalardb-samples/scalardb-sample directory.
To start SQL Server, run the following command:
docker compose up -d sqlserver
Configure ScalarDB
The database.properties file in the scalardb-samples/scalardb-sample directory contains database configurations. Please uncomment the properties for SQL Server in the database.properties file so that the configuration looks as follows:
# For SQL Server
scalar.db.storage=jdbc
scalar.db.contact_points=jdbc:sqlserver://localhost:1433;encrypt=true;trustServerCertificate=true
scalar.db.username=sa
scalar.db.password=SqlServer22
Configure ScalarDB
SQLite is an embedded, file-based database, so there is no separate server to start. ScalarDB creates the database file automatically when it is first used. The database.properties file in thescalardb-samples/scalardb-sample directory contains database configurations. Please uncomment the properties for SQLite in the database.properties file so that the configuration looks as follows:# For Sqlite
scalar.db.storage=jdbc
scalar.db.contact_points=jdbc:sqlite:scalardb-sample.sqlite3?busy_timeout=10000
scalar.db.username=
scalar.db.password=
Select your NewSQL database.
- YugabyteDB
Run YugabyteDB locally
You can run YugabyteDB in Docker Compose by using the docker-compose.yml file in the scalardb-samples/scalardb-sample directory.
To start YugabyteDB, run the following command:
docker compose up -d yugabyte
Configure ScalarDB
The database.properties file in the scalardb-samples/scalardb-sample directory contains database configurations. Please uncomment the properties for YugabyteDB in the database.properties file so that the configuration looks as follows:
# For Yugabyte
scalar.db.storage=jdbc
scalar.db.contact_points=jdbc:yugabytedb://localhost:5433/postgres
scalar.db.username=yugabyte
scalar.db.password=yugabyte
Select your NoSQL database.
- Cassandra
- Cosmos DB for NoSQL
- DynamoDB
Run Cassandra locally
You can run Apache Cassandra in Docker Compose by using the docker-compose.yml file in the scalardb-samples/scalardb-sample directory.
To start Apache Cassandra, run the following command:
docker compose up -d cassandra
Configure ScalarDB
The database.properties file in the scalardb-samples/scalardb-sample directory contains database configurations. Please uncomment the properties for Cassandra in the database.properties file so that the configuration looks as follows:
# For Cassandra
scalar.db.storage=cassandra
scalar.db.contact_points=localhost
scalar.db.username=cassandra
scalar.db.password=cassandra
To use Azure Cosmos DB for NoSQL, you must have an Azure account. If you don't have an Azure account, visit Create an Azure Cosmos DB account.
Configure Cosmos DB for NoSQL
Set the default consistency level to Strong according to the official document at Configure the default consistency level.
Configure ScalarDB
The database.properties file in the scalardb-samples/scalardb-sample directory contains database configurations. Be sure to change the values for scalar.db.contact_points and scalar.db.password as described.
# For Cosmos DB
scalar.db.storage=cosmos
scalar.db.contact_points=<COSMOS_DB_FOR_NOSQL_URI>
scalar.db.password=<COSMOS_DB_FOR_NOSQL_KEY>
You can use the primary key or the secondary key in your Azure Cosmos DB account as the value for scalar.db.password.
Run Amazon DynamoDB Local
You can run Amazon DynamoDB Local in Docker Compose by using the docker-compose.yml file in the scalardb-samples/scalardb-sample directory.
To start Amazon DynamoDB Local, run the following command:
docker compose up -d dynamodb
Configure ScalarDB
The database.properties file in the scalardb-samples/scalardb-sample directory contains database configurations. Please uncomment the properties for Amazon DynamoDB Local in the database.properties file so that the configuration looks as follows:
# For DynamoDB Local
scalar.db.storage=dynamo
scalar.db.contact_points=sample
scalar.db.username=sample
scalar.db.password=sample
scalar.db.dynamo.endpoint_override=http://localhost:8000
Load the database schema
You need to define the database schema (the method in which the data will be organized) in the application. For details about the supported data types, see Database Adapters.
For this tutorial, a file named schema.json already exists in the scalardb-samples/scalardb-sample directory. To apply the schema, go to the scalardb Releases page and download the ScalarDB Schema Loader that matches the version of ScalarDB that you are using to the scalardb-samples/scalardb-sample directory.
Then, run the following command, replacing <VERSION> with the version of the ScalarDB Schema Loader that you downloaded:
- Relational databases
- NewSQL databases
- NoSQL databases
Select your relational database.
- Db2
- MariaDB
- MySQL
- Oracle Database
- PostgreSQL
- SQL Server
- SQLite
java -jar scalardb-schema-loader-<VERSION>.jar --config database.properties --schema-file schema.json --coordinator
The --coordinator option is specified because a table with transaction set to true exists in the schema. For details about configuring and loading a schema, see ScalarDB Schema Loader.
Select your NewSQL database.
- YugabyteDB
java -jar scalardb-schema-loader-<VERSION>.jar --config database.properties --schema-file schema.json --coordinator
The --coordinator option is specified because a table with transaction set to true exists in the schema. For details about configuring and loading a schema, see ScalarDB Schema Loader.
Select your NoSQL database.
- Cassandra
- Cosmos DB for NoSQL
- DynamoDB
java -jar scalardb-schema-loader-<VERSION>.jar --config database.properties --schema-file schema.json --coordinator --replication-factor=1
The --coordinator option is specified because a table with transaction set to true exists in the schema. For details about configuring and loading a schema, see ScalarDB Schema Loader.
In addition, the --replication-factor=1 option has an effect only when using Cassandra. The default replication factor is 3, but to facilitate the setup in this tutorial, 1 is used so that you only need to prepare a cluster with one node instead of three nodes. However, keep in mind that a replication factor of 1 is not suited for production.
java -jar scalardb-schema-loader-<VERSION>.jar --config database.properties --schema-file schema.json --coordinator
The --coordinator option is specified because a table with transaction set to true exists in the schema. For details about configuring and loading a schema, see ScalarDB Schema Loader.
java -jar scalardb-schema-loader-<VERSION>.jar --config database.properties --schema-file schema.json --coordinator --no-backup --no-scaling
The --coordinator option is specified because a table with transaction set to true exists in the schema. For details about configuring and loading a schema, see ScalarDB Schema Loader.
Also, --no-backup and --no-scaling options are specified because Amazon DynamoDB Local does not support continuous backup and auto-scaling.
Schema details
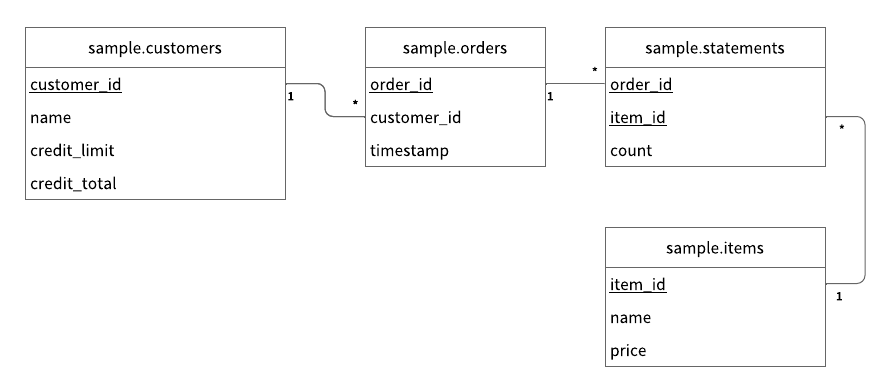
As shown in schema.json for the sample application, all the tables are created in the sample namespace.
sample.customers: a table that manages customer informationcredit_limit: the maximum amount of money that the lender will allow the customer to spend from their line of creditcredit_total: the amount of money that the customer has spent from their line of credit
sample.orders: a table that manages order informationsample.statements: a table that manages order statement informationsample.items: a table that manages information for items to be ordered
The Entity Relationship Diagram for the schema is as follows:
Load the initial data
Before running the sample application, you need to load the initial data by running the following command:
./gradlew run --args="LoadInitialData"
After the initial data has loaded, the following records should be stored in the tables.
sample.customers table
| customer_id | name | credit_limit | credit_total |
|---|---|---|---|
| 1 | Yamada Taro | 10000 | 0 |
| 2 | Yamada Hanako | 10000 | 0 |
| 3 | Suzuki Ichiro | 10000 | 0 |
sample.items table
| item_id | name | price |
|---|---|---|
| 1 | Apple | 1000 |
| 2 | Orange | 2000 |
| 3 | Grape | 2500 |
| 4 | Mango | 5000 |
| 5 | Melon | 3000 |
Execute transactions and retrieve data in the sample application
The following sections describe how to execute transactions and retrieve data in the sample e-commerce application.
Get customer information
Start with getting information about the customer whose ID is 1 by running the following command:
./gradlew run --args="GetCustomerInfo 1"
You should see the following output:
...
{"id": 1, "name": "Yamada Taro", "credit_limit": 10000, "credit_total": 0}
...
Place an order
Then, have customer ID 1 place an order for three apples and two oranges by running the following command:
The order format in this command is ./gradlew run --args="PlaceOrder <CUSTOMER_ID> <ITEM_ID>:<COUNT>,<ITEM_ID>:<COUNT>,...".
./gradlew run --args="PlaceOrder 1 1:3,2:2"
You should see a similar output as below, with a different UUID for order_id, which confirms that the order was successful:
...
{"order_id": "dea4964a-ff50-4ecf-9201-027981a1566e"}
...
Check the order details
Check details about the order by running the following command, replacing <ORDER_ID_UUID> with the UUID for the order_id that was shown after running the previous command:
./gradlew run --args="GetOrder <ORDER_ID_UUID>"
You should see a similar output as below, with different UUIDs for order_id and timestamp:
...
{"order": {"order_id": "dea4964a-ff50-4ecf-9201-027981a1566e","timestamp": 1650948340914,"customer_id": 1,"customer_name": "Yamada Taro","statement": [{"item_id": 1,"item_name": "Apple","price": 1000,"count": 3,"total": 3000},{"item_id": 2,"item_name": "Orange","price": 2000,"count": 2,"total": 4000}],"total": 7000}}
...
Place another order
Place an order for one melon that uses the remaining amount in credit_total for customer ID 1 by running the following command:
./gradlew run --args="PlaceOrder 1 5:1"
You should see a similar output as below, with a different UUID for order_id, which confirms that the order was successful:
...
{"order_id": "bcc34150-91fa-4bea-83db-d2dbe6f0f30d"}
...
Check the order history
Get the history of all orders for customer ID 1 by running the following command:
./gradlew run --args="GetOrders 1"
You should see a similar output as below, with different UUIDs for order_id and timestamp, which shows the history of all orders for customer ID 1 in descending order by timestamp:
...
{"order": [{"order_id": "dea4964a-ff50-4ecf-9201-027981a1566e","timestamp": 1650948340914,"customer_id": 1,"customer_name": "Yamada Taro","statement": [{"item_id": 1,"item_name": "Apple","price": 1000,"count": 3,"total": 3000},{"item_id": 2,"item_name": "Orange","price": 2000,"count": 2,"total": 4000}],"total": 7000},{"order_id": "bcc34150-91fa-4bea-83db-d2dbe6f0f30d","timestamp": 1650948412766,"customer_id": 1,"customer_name": "Yamada Taro","statement": [{"item_id": 5,"item_name": "Melon","price": 3000,"count": 1,"total": 3000}],"total": 3000}]}
...
Check the credit total
Get the credit total for customer ID 1 by running the following command:
./gradlew run --args="GetCustomerInfo 1"
You should see the following output, which shows that customer ID 1 has reached their credit_limit in credit_total and cannot place anymore orders:
...
{"id": 1, "name": "Yamada Taro", "credit_limit": 10000, "credit_total": 10000}
...
Try to place an order for one grape and one mango by running the following command:
./gradlew run --args="PlaceOrder 1 3:1,4:1"
You should see the following output, which shows that the order failed because the credit_total amount would exceed the credit_limit amount.
...
java.lang.RuntimeException: Credit limit exceeded
        at sample.Sample.placeOrder(Sample.java:205)
        at sample.command.PlaceOrderCommand.call(PlaceOrderCommand.java:33)
        at sample.command.PlaceOrderCommand.call(PlaceOrderCommand.java:8)
        at picocli.CommandLine.executeUserObject(CommandLine.java:1783)
        at picocli.CommandLine.access$900(CommandLine.java:145)
        at picocli.CommandLine$RunLast.handle(CommandLine.java:2141)
        at picocli.CommandLine$RunLast.handle(CommandLine.java:2108)
        at picocli.CommandLine$AbstractParseResultHandler.execute(CommandLine.java:1975)
        at picocli.CommandLine.execute(CommandLine.java:1904)
        at sample.command.SampleCommand.main(SampleCommand.java:35)
...
Make a payment
To continue making orders, customer ID 1 must make a payment to reduce the credit_total amount.
Make a payment by running the following command:
./gradlew run --args="Repayment 1 8000"
Then, check the credit_total amount for customer ID 1 by running the following command:
./gradlew run --args="GetCustomerInfo 1"
You should see the following output, which shows that a payment was applied to customer ID 1, reducing the credit_total amount:
...
{"id": 1, "name": "Yamada Taro", "credit_limit": 10000, "credit_total": 2000}
...
Now that customer ID 1 has made a payment, place an order for one grape and one mango by running the following command:
./gradlew run --args="PlaceOrder 1 3:1,4:1"
You should see a similar output as below, with a different UUID for order_id, which confirms that the order was successful:
...
{"order_id": "8911cab3-1c2b-4322-9386-adb1c024e078"}
...
Stop the database
To stop the database, stop the Docker container by running the following command:
docker compose down
Reference
To see the source code for the e-commerce application used in this tutorial, see Sample.java.