Transactions with a Two-Phase Commit Interface
ScalarDB supports executing transactions with a two-phase commit interface. With the two-phase commit interface, you can execute a transaction that spans multiple processes or applications, like in a microservice architecture.
This page explains how transactions with a two-phase commit interface work in ScalarDB and how to configure and execute them in ScalarDB.
How transactions with a two-phase commit interface work in ScalarDB
ScalarDB normally executes transactions in a single transaction manager instance with a one-phase commit interface. In transactions with a one-phase commit interface, you begin a transaction, execute CRUD operations, and commit the transaction in the same transaction manager instance.
In ScalarDB, you can execute transactions with a two-phase commit interface that span multiple transaction manager instances. The transaction manager instances can be in the same process or application, or the instances can be in different processes or applications. For example, if you have transaction manager instances in multiple microservices, you can execute a transaction that spans multiple microservices.
In transactions with a two-phase commit interface, there are two roles—Coordinator and a participant—that collaboratively execute a single transaction.
The Coordinator process and the participant processes all have different transaction manager instances. The Coordinator process first begins or starts a transaction, and the participant processes join the transaction. After executing CRUD operations, the Coordinator process and the participant processes commit the transaction by using the two-phase interface.
How to execute transactions with a two-phase commit interface
To execute a two-phase commit transaction, you must get the transaction manager instance. Then, the Coordinator process can begin or start the transaction, and the participant can process the transaction.
Get a TwoPhaseCommitTransactionManager instance
You first need to get a TwoPhaseCommitTransactionManager instance to execute transactions with a two-phase commit interface.
To get a TwoPhaseCommitTransactionManager instance, you can use TransactionFactory as follows:
TransactionFactory factory = TransactionFactory.create("<CONFIGURATION_FILE_PATH>");
TwoPhaseCommitTransactionManager manager = factory.getTwoPhaseCommitTransactionManager();
Begin or start a transaction (for Coordinator)
For the process or application that begins the transaction to act as Coordinator, you should use the following begin method:
// Begin a transaction.
TwoPhaseCommitTransaction tx = manager.begin();
Or, for the process or application that starts the transaction to act as Coordinator, you should use the following start method:
// Start a transaction.
TwoPhaseCommitTransaction tx = manager.start();
Alternatively, you can use the begin method for a transaction by specifying a transaction ID as follows:
// Begin a transaction by specifying a transaction ID.
TwoPhaseCommitTransaction tx = manager.begin("<TRANSACTION_ID>");
Or, you can use the start method for a transaction by specifying a transaction ID as follows:
// Start a transaction by specifying a transaction ID.
TwoPhaseCommitTransaction tx = manager.start("<TRANSACTION_ID>");
Join a transaction (for participants)
For participants, you can join a transaction by specifying the transaction ID associated with the transaction that Coordinator has started or begun as follows:
TwoPhaseCommitTransaction tx = manager.join("<TRANSACTION_ID>")
To get the transaction ID with getId(), you can specify the following:
tx.getId();
CRUD operations for the transaction
The CRUD operations for TwoPhaseCommitTransacton are the same as the operations for DistributedTransaction. For details, see CRUD operations.
The following is example code for CRUD operations in transactions with a two-phase commit interface:
TwoPhaseCommitTransaction tx = ...

// Retrieve the current balances by ID.
Get fromGet =
    Get.newBuilder()
        .namespace(NAMESPACE)
        .table(TABLE)
        .partitionKey(new Key(ID, fromId))
        .build();

Get toGet =
    Get.newBuilder()
        .namespace(NAMESPACE)
        .table(TABLE)
        .partitionKey(new Key(ID, toId))
        .build();

Optional<Result> fromResult = tx.get(fromGet);
Optional<Result> toResult = tx.get(toGet);

// Calculate the balances (assuming that both accounts exist).
int newFromBalance = fromResult.get().getInt(BALANCE) - amount;
int newToBalance = toResult.get().getInt(BALANCE) + amount;

// Update the balances.
Put fromPut =
    Put.newBuilder()
        .namespace(NAMESPACE)
        .table(TABLE)
        .partitionKey(new Key(ID, fromId))
        .intValue(BALANCE, newFromBalance)
        .build();

Put toPut =
    Put.newBuilder()
        .namespace(NAMESPACE)
        .table(TABLE)
        .partitionKey(new Key(ID, toId))
        .intValue(BALANCE, newToBalance)
        .build();

tx.put(fromPut);
tx.put(toPut);
Prepare, commit, or roll back a transaction
After finishing CRUD operations, you need to commit the transaction. As with the standard two-phase commit protocol, there are two phases: prepare and commit.
In all the Coordinator and participant processes, you need to prepare and then commit the transaction as follows:
TwoPhaseCommitTransaction tx = ...

try {
  // Execute CRUD operations in the Coordinator and participant processes.
  ...

  // Prepare phase: Prepare the transaction in all the Coordinator and participant processes.
  tx.prepare();
  ...

  // Commit phase: Commit the transaction in all the Coordinator and participant processes.
  tx.commit();
  ...
} catch (TransactionException e) {
  // If an error happens, you will need to roll back the transaction in all the Coordinator and participant processes.
  tx.rollback();
  ...
}
For prepare(), if any of the Coordinator or participant processes fail to prepare the transaction, you will need to call rollback() (or abort()) in all the Coordinator and participant processes.
For commit(), if any of the Coordinator or participant processes successfully commit the transaction, you can consider the transaction as committed. When a transaction has been committed, you can ignore any errors in the other Coordinator and participant processes. If all the Coordinator and participant processes fail to commit the transaction, you will need to call rollback() (or abort()) in all the Coordinator and participant processes.
Validate the transaction
Depending on the concurrency control protocol, you need to call validate() in all the Coordinator and participant processes after prepare() and before commit(), as shown below:
// Prepare phase 1: Prepare the transaction in all the Coordinator and participant processes.
tx.prepare();
...

// Prepare phase 2: Validate the transaction in all the Coordinator and participant processes.
tx.validate();
...

// Commit phase: Commit the transaction in all the Coordinator and participant processes.
tx.commit();
...
Similar to prepare(), if any of the Coordinator or participant processes fail to validate the transaction, you will need to call rollback() (or abort()) in all the Coordinator and participant processes. In addition, you can call validate() in the Coordinator and participant processes in parallel for better performance.
When using the Consensus Commit transaction manager with EXTRA_READ set as the value for scalar.db.consensus_commit.serializable_strategy and SERIALIZABLE set as the value for scalar.db.consensus_commit.isolation_level, you need to call validate(). However, if you are not using Consensus Commit, specifying validate() will not have any effect.
Suspend and resume a transaction
Given that processes or applications that use transactions with a two-phase commit interface usually involve multiple request and response exchanges, you might need to execute a transaction across various endpoints or APIs. For such scenarios, you can use suspend() to suspend a transaction object and resume() to resume a transaction object (an instance of TwoPhaseCommitTransaction) that you previously began or joined.
The following shows how suspend() and resume() works:
// Join (or begin) the transaction.
TwoPhaseCommitTransaction tx = manager.join("<TRANSACTION_ID>");

...

// Suspend the transaction.
manager.suspend(tx);

...

// Resume the transaction by using the transaction ID.
TwoPhaseCommitTransaction tx1 = manager.resume("<TRANSACTION_ID>")
To get the transaction ID with getId(), you can specify the following:
tx.getId();
The following is an example of two services that have multiple endpoints:
interface ServiceA {
  void facadeEndpoint() throws Exception;
}

interface ServiceB {
  void endpoint1(String txId) throws Exception;

  void endpoint2(String txId) throws Exception;

  void prepare(String txId) throws Exception;

  void commit(String txId) throws Exception;

  void rollback(String txId) throws Exception;
}
The following is an example of a client calling ServiceA.facadeEndpoint() that starts a transaction that spans the two services (ServiceA and ServiceB):
public class ServiceAImpl implements ServiceA {

  private TwoPhaseCommitTransactionManager manager = ...;
  private ServiceB serviceB = ...;

  ...

  @Override
  public void facadeEndpoint() throws Exception {
    TwoPhaseCommitTransaction tx = manager.start();

    try {
      ...

      // Call `ServiceB` `endpoint1`.
      serviceB.endpoint1(tx.getId());

      ...

      // Call `ServiceB` `endpoint2`.
      serviceB.endpoint2(tx.getId());

      ...

      // Prepare.
      tx.prepare();
      serviceB.prepare(tx.getId());

      // Commit.
      tx.commit();
      serviceB.commit(tx.getId());
    } catch (Exception e) {
      // Roll back.
      tx.rollback();
      serviceB.rollback(tx.getId());
    }
  }
}
As shown above, the facade endpoint in ServiceA calls multiple endpoints (endpoint1(), endpoint2(), prepare(), commit(), and rollback()) of ServiceB. In addition, in transactions with a two-phase commit interface, you need to use the same transaction object across the endpoints.
In this situation, you can suspend and resume the transaction. The implementation of ServiceB is as follows:
public class ServiceBImpl implements ServiceB {

  private TwoPhaseCommitTransactionManager manager = ...;

  ...

  @Override
  public void endpoint1(String txId) throws Exception {
    // Join the transaction.
    TwoPhaseCommitTransaction tx = manager.join(txId);

    ...

    // Suspend the transaction object.
    manager.suspend(tx);
  }

  @Override
  public void endpoint2(String txId) throws Exception {
    // Resume the transaction that you joined in `endpoint1()`.
    TwoPhaseCommitTransaction tx = manager.resume(txId);

    ...

    // Suspend the transaction object.
    manager.suspend(tx);
  }

  @Override
  public void prepare(String txId) throws Exception {
    // Resume the transaction.
    TwoPhaseCommitTransaction tx = manager.resume(txId);

    ...

    // Prepare.
    tx.prepare();

    ...

    // Suspend the transaction object.
    manager.suspend(tx);
  }

  @Override
  public void commit(String txId) throws Exception {
    // Resume the transaction.
    TwoPhaseCommitTransaction tx = manager.resume(txId);
    try {
      ...

      // Commit.
      tx.commit();
    } catch (Exception e) {
      // Suspend the transaction object. You need to suspend the transaction if a commit fails
      // because you will need to roll back that transaction.
      manager.suspend(tx);
    }
  }

  @Override
  public void rollback(String txId) throws Exception {
    // Resume the transaction.
    TwoPhaseCommitTransaction tx = manager.resume(txId);

    ...

    // Roll back.
    tx.rollback();
  }
}
As shown above, by resuming the transaction, you can share the same transaction object across multiple endpoints in ServiceB.
Request routing in transactions with a two-phase commit interface
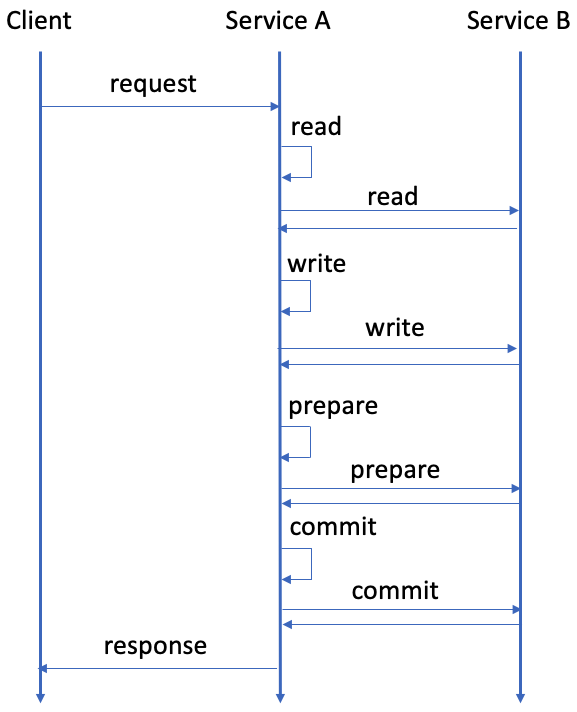
Services that use transactions with a two-phase commit interface usually execute a transaction by exchanging multiple requests and responses, as shown in the following diagram:

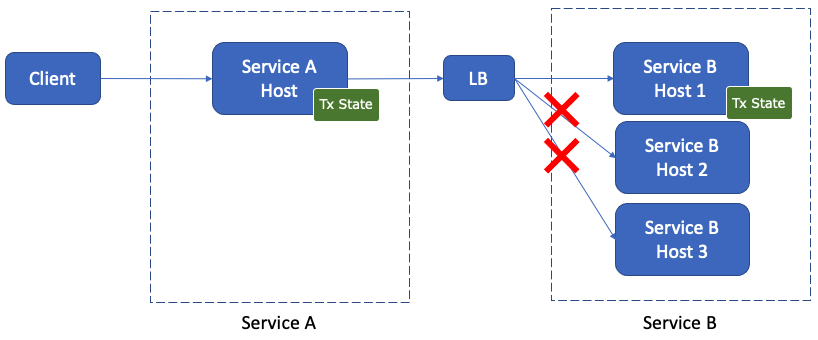
In addition, each service typically has multiple servers (or hosts) for scalability and availability and uses server-side (proxy) or client-side load balancing to distribute requests to the servers. In such a case, since transaction processing in transactions with a two-phase commit interface is stateful, requests in a transaction must be routed to the same servers while different transactions need to be distributed to balance the load, as shown in the following diagram:

There are several approaches to achieve load balancing for transactions with a two-phase commit interface depending on the protocol between the services. Some approaches for this include using gRPC and HTTP/1.1.
gRPC
When you use a client-side load balancer, you can use the same gRPC connection to send requests in a transaction, which guarantees that the requests go to the same servers.
When you use a server-side (proxy) load balancer, solutions are different between an L3/L4 (transport-level) load balancer and an L7 (application-level) load balancer:
- When using an L3/L4 load balancer, you can use the same gRPC connection to send requests in a transaction, similar to when you use a client-side load balancer. In this case, requests in the same gRPC connection always go to the same server.
- When using an L7 load balancer, since requests in the same gRPC connection don't necessarily go to the same server, you need to use cookies or similar method to route requests to the correct server.
- For example, if you use Envoy, you can use session affinity (sticky session) for gRPC. Alternatively, you can use bidirectional streaming RPC in gRPC since the L7 load balancer distributes requests in the same stream to the same server.
For more details about load balancing in gRPC, see gRPC Load Balancing.
HTTP/1.1
Typically, you use a server-side (proxy) load balancer with HTTP/1.1:
- When using an L3/L4 load balancer, you can use the same HTTP connection to send requests in a transaction, which guarantees the requests go to the same server.
- When using an L7 load balancer, since requests in the same HTTP connection don't necessarily go to the same server, you need to use cookies or similar method to route requests to the correct server. You can use session affinity (sticky session) in that case.
Hands-on tutorial
One of the use cases for transactions with a two-phase commit interface is microservice transactions. For a hands-on tutorial, see Create a Sample Application That Supports Microservice Transactions.