Create an Application That Supports Microservice Transactions by Using the Microservice Transaction API
This tutorial describes how to create a sample e-commerce application that supports microservice transactions by using the Microservice Transaction API.
The Microservice Transaction API lets you run a single transaction across several processes without implementing the two-phase commit protocol yourself. Your services never call prepare, validate, or commit; ScalarDB Cluster does that on their behalf.
Because of that, the same application code runs against either ScalarDB Cluster deployment pattern—the shared-cluster pattern or the separated-cluster pattern. This sample is arranged to make that concrete: it contains one copy of the application code and two sets of configuration files. Use the tabs throughout this page to choose a pattern; your choice carries through every step.
Both deployment patterns run ScalarDB Cluster nodes, so a license key is required whichever one you choose.
Overview of the sample microservice application
The sample e-commerce application shows how users can order and pay for items by using a line of credit.
The sample application has two microservices called the Customer Service and the Order Service based on the database-per-service pattern:
- The Customer Service manages customer information, including line-of-credit information, credit limit, and credit total.
- The Order Service is responsible for order operations like placing an order and getting order histories.
Each service has gRPC endpoints. Clients call the endpoints, and the services call each endpoint as well.
The databases that you will be using in the sample application are MySQL, Cassandra, and PostgreSQL. The Customer Service and the Order Service use MySQL and Cassandra respectively, through ScalarDB Cluster, and PostgreSQL holds the Coordinator tables. Both deployment patterns use the same three databases and put each namespace in the same one, so the ScalarDB topology is the only thing that changes between them.
The two deployment patterns differ in how ScalarDB Cluster sits between the services and those databases.
In the shared-cluster pattern, both services connect to one cluster node, which reaches all three databases:
In the separated-cluster pattern, each service owns a cluster, a Transaction Coordinator drives the transaction across them, and the Coordinator tables move to a store of their own that every component reaches:
The two sides are symmetric: each owns a service, a cluster, and a database. What sits outside them is shared: the Transaction Coordinator, which drives the transaction, and the Coordinator tables, which the Transaction Coordinator and both clusters read from and write to.
The application code is the same in both. Only the configuration differs.
Since the focus of the sample application is to demonstrate using the Microservice Transaction API, application-specific error handling, authentication processing, and similar functions are not included in the sample application.
Authentication and authorization are also not enabled, to keep the difference between the two deployment patterns easy to read. Before adapting this topology for a real system, add per-service users and namespace privileges. For details, see Authenticate and Authorize Users.
Service endpoints
The endpoints defined in the services are as follows:
-
Customer Service
getCustomerInfopaymentrepayment
-
Order Service
placeOrdergetOrdergetOrders
The Customer Service exposes no prepare, validate, commit, or rollback endpoints. Not needing them is the point of the Microservice Transaction API.
What you can do in this sample application
The sample application supports the following types of transactions:
- Get customer information through the
getCustomerInfoendpoint of the Customer Service. - Place an order by using a line of credit through the
placeOrderendpoint of the Order Service and thepaymentendpoint of the Customer Service.- Checks if the cost of the order is below the customer's credit limit.
- If the check passes, records the order history and updates the amount the customer has spent.
- Get order information by order ID through the
getOrderendpoint of the Order Service and thegetCustomerInfoendpoint of the Customer Service. - Get order information by customer ID through the
getOrdersendpoint of the Order Service and thegetCustomerInfoendpoint of the Customer Service. - Make a payment through the
repaymentendpoint of the Customer Service.- Reduces the amount the customer has spent.
placeOrder, getOrder, and getOrders each run as one transaction across both services, and therefore across MySQL and Cassandra. getCustomerInfo and repayment run within the Customer Service alone when called directly, so they use the ordinary Transaction API instead.
How the Microservice Transaction API works
This section explains the API itself. It applies to both deployment patterns. For the full API reference, see ScalarDB Cluster Java API Guide.
Use this API only for transactions that span services. A transaction that stays within one service has nothing to coordinate across processes, so it uses the ordinary Transaction API (DistributedTransactionManager) instead. Both managers come from the same TransactionFactory and the same configuration file:
TransactionFactory factory = TransactionFactory.create("<CONFIGURATION_FILE_PATH>");
DistributedTransactionManager transactionManager = factory.getTransactionManager();
GlobalTransactionManager globalTransactionManager = factory.getGlobalTransactionManager();
A transaction that spans services has two kinds of handles:
- A
GlobalTransaction, obtained frombegin()orbeginReadOnly(). It drives the outcome of the transaction as a whole and holds no data. - A
BranchTransactionper service, obtained frombeginBranch(transactionId). It is the CRUD handle for that service's part of the work.
The initiator
One service begins the transaction, shares its ID with the others, and decides the outcome. In this sample, the Order Service is the initiator:
GlobalTransaction global = globalTransactionManager.begin();
BranchTransaction branch = null;
try {
  branch = globalTransactionManager.beginBranch(global.getId());
  // ... this service's own CRUD ...
  branch.end(BranchTransaction.Status.SUCCESS);
  branch = null;

  callCustomerService(global.getId());  // pass the transaction ID over gRPC

  global.commit();
} catch (UnknownTransactionStatusException e) {
  // ... end the branch with FAILURE; do not roll back ...
} catch (Exception e) {
  // ... end the branch with FAILURE, then roll back ...
}
Notice the order: this service finishes its own work and ends its branch before calling the other service. Keeping the branch open across the remote call would also be correct, but ending it as soon as the service is done is the idiom the API is designed around.
The participant
A service that receives a transaction ID joins the same transaction with its own branch, does its work, and ends the branch. It does not commit or roll back—that is the initiator's responsibility:
BranchTransaction branch = globalTransactionManager.beginBranch(transactionId);
// ... this service's own CRUD ...
branch.end(BranchTransaction.Status.SUCCESS);
In this sample, the Customer Service runs as a participant when the request carries a transaction ID. Otherwise its work stays within the service, so it runs as an ordinary transaction through the Transaction API rather than the Microservice Transaction API. The payment endpoint is always a participant; repayment never is; getCustomerInfo is either, depending on the caller.
Ending a branch is mandatory
Every branch must be ended exactly once, whatever the outcome. That obligation belongs to the process running the branch, and no other process can discharge it. On a failure path, end the branch with Status.FAILURE:
branch.end(BranchTransaction.Status.FAILURE);
end(FAILURE) is lenient so that it can be called from a catch block: ending a branch that has already been ended is a no-op, and it does not mask the original failure.
end(Status), commit(), and rollback() each declare checked exceptions, so a catch block that calls them needs its own handling.
Error handling
Only the initiator can restart a transaction, so only the initiator retries. In this sample, the Order Service carries a retry loop, as does the Customer Service for the transactions it runs on its own; the participant path does not.
Not every failure is worth retrying. The sample treats the gRPC NOT_FOUND and FAILED_PRECONDITION statuses as deterministic business failures—an unknown item, or an exceeded credit limit—and does not retry them.
UnknownTransactionStatusException is handled separately and is never retried. It means the transaction may or may not have been committed; retrying could duplicate a committed transaction. Determining the actual status is the application's responsibility.
Prerequisites
- One of the following Java Development Kits (JDKs):
- Oracle JDK: 8, 11, 17, or 21 (LTS versions)
- OpenJDK distribution (Eclipse Temurin, Amazon Corretto, or Microsoft Build of OpenJDK): 8, 11, 17, or 21 (LTS versions)
- Docker 20.10 or later with Docker Compose V2 or later
You need to have a license key (trial license or commercial license) to use ScalarDB Cluster. If you don't have a license key, you can use a ready-to-use trial license key by following How to Configure a Trial License Key. To obtain a commercial license, please contact us.
Set up ScalarDB Cluster
The following sections describe how to set up the sample application that supports microservice transactions by using the Microservice Transaction API in ScalarDB Cluster.
Clone the ScalarDB samples repository
Open Terminal, then clone the ScalarDB samples repository by running the following command:
git clone https://github.com/scalar-labs/scalardb-samples
Then, go to the directory that contains the sample application by running the following command:
cd scalardb-samples/microservice-transaction-sample-with-cluster/
Choose a deployment pattern
The sample contains one copy of the application code and two directories of configuration:
shared-cluster/: Both services connect to one ScalarDB Cluster node, which holds both namespaces and the Coordinator tables.separated-clusters/: Each service owns a ScalarDB Cluster node, and a Transaction Coordinator drives two-phase commit across them. The Coordinator tables live in a store of their own, which every ScalarDB component in the pattern can reach.
For guidance on choosing between the patterns, see ScalarDB Cluster Deployment Patterns for Microservices.
Select a pattern below. Your selection applies to every step on this page.
- Shared cluster
- Separated clusters
Every command in this tutorial is run from the shared-cluster directory:
cd shared-cluster/
Every command in this tutorial is run from the separated-clusters directory:
cd separated-clusters/
Set the license key
Each ScalarDB Cluster node checks a license key at startup, so you need to set yours in the properties file for every node that the pattern you selected runs.
- Shared cluster
- Separated clusters
Set the license key and certificate for ScalarDB Cluster in scalardb-cluster-node.properties:
scalar.db.cluster.node.licensing.license_key=<YOUR_LICENSE_KEY>
scalar.db.cluster.node.licensing.license_check_cert_pem=<YOUR_LICENSE_CHECK_CERT_PEM>
Set the license key and certificate for ScalarDB Cluster in both customer-cluster.properties and order-cluster.properties:
scalar.db.cluster.node.licensing.license_key=<YOUR_LICENSE_KEY>
scalar.db.cluster.node.licensing.license_check_cert_pem=<YOUR_LICENSE_CHECK_CERT_PEM>
The Transaction Coordinator is not a licensed component and needs no license key.
For details, see How to Configure a Product License Key.
For the sake of quickly setting up this sample application, ScalarDB Cluster runs in standalone mode and wire encryption is not enabled. For a production environment, we recommend enabling wire encryption. For details, see ScalarDB Cluster Standalone Mode and Wire encryption.
ScalarDB Cluster configuration
The properties files for both patterns are already configured for the sample application, so there is nothing to change in this section or the next beyond the license key you set above. Both sections explain what the settings do.
The cluster-side configuration is where the two patterns are structurally different. The microservice configuration that follows mostly reflects the settings here.
- Shared cluster
- Separated clusters
One node serves both services, so it needs access to both namespaces and to the Coordinator tables. It uses multi-storage to reach MySQL, Cassandra, and PostgreSQL, in scalardb-cluster-node.properties:
scalar.db.storage=multi-storage
scalar.db.multi_storage.storages=mysql,cassandra,coordinatordb

scalar.db.multi_storage.storages.mysql.storage=jdbc
scalar.db.multi_storage.storages.mysql.contact_points=jdbc:mysql://mysql:3306/?sslMode=REQUIRED
scalar.db.multi_storage.storages.mysql.username=root
scalar.db.multi_storage.storages.mysql.password=mysql

scalar.db.multi_storage.storages.cassandra.storage=cassandra
scalar.db.multi_storage.storages.cassandra.contact_points=cassandra
scalar.db.multi_storage.storages.cassandra.username=cassandra
scalar.db.multi_storage.storages.cassandra.password=cassandra

scalar.db.multi_storage.storages.coordinatordb.storage=jdbc
scalar.db.multi_storage.storages.coordinatordb.contact_points=jdbc:postgresql://postgres:5432/postgres
scalar.db.multi_storage.storages.coordinatordb.username=postgres
scalar.db.multi_storage.storages.coordinatordb.password=postgres

scalar.db.multi_storage.namespace_mapping=customer_service:mysql,coordinator:coordinatordb
scalar.db.multi_storage.default_storage=cassandra

scalar.db.cluster.node.standalone_mode.enabled=true
namespace_mapping sends each namespace to a storage, and default_storage catches any namespace not listed, which is why order_service needs no entry. The Coordinator tables get a database of their own here as well as in the other pattern, so that each namespace lives in the same database in both and the topology is the only difference.
standalone_mode.enabled=true runs the node as a single instance with static membership. Without it, the node tries to discover peers through Kubernetes.
For details about multi-storage, see How to configure ScalarDB to support multi-storage transactions. For details about standalone mode, see ScalarDB Cluster Standalone Mode.
This pattern has two kinds of nodes to configure: participant clusters and the Transaction Coordinator.
Participant clusters
Each participant cluster owns one application namespace, but it also has to reach the Coordinator tables, so it uses multi-storage as well. The two files have the same shape and differ in the database they own and the ID they carry.
customer-cluster.properties:
scalar.db.storage=multi-storage
scalar.db.multi_storage.storages=mysql,coordinatordb

scalar.db.multi_storage.storages.mysql.storage=jdbc
scalar.db.multi_storage.storages.mysql.contact_points=jdbc:mysql://mysql:3306/?sslMode=REQUIRED
scalar.db.multi_storage.storages.mysql.username=root
scalar.db.multi_storage.storages.mysql.password=mysql

scalar.db.multi_storage.storages.coordinatordb.storage=jdbc
scalar.db.multi_storage.storages.coordinatordb.contact_points=jdbc:postgresql://postgres:5432/postgres
scalar.db.multi_storage.storages.coordinatordb.username=postgres
scalar.db.multi_storage.storages.coordinatordb.password=postgres
scalar.db.multi_storage.storages.coordinatordb.jdbc.connection_pool.max_total=25
scalar.db.multi_storage.storages.coordinatordb.jdbc.table_metadata.connection_pool.max_total=5

scalar.db.multi_storage.namespace_mapping=coordinator:coordinatordb
scalar.db.multi_storage.default_storage=mysql

scalar.db.cluster.node.standalone_mode.enabled=true
scalar.db.cluster.node.transaction_participant.enabled=true
scalar.db.cluster.id=customer-cluster
order-cluster.properties:
scalar.db.storage=multi-storage
scalar.db.multi_storage.storages=cassandra,coordinatordb

scalar.db.multi_storage.storages.cassandra.storage=cassandra
scalar.db.multi_storage.storages.cassandra.contact_points=cassandra
scalar.db.multi_storage.storages.cassandra.username=cassandra
scalar.db.multi_storage.storages.cassandra.password=cassandra

scalar.db.multi_storage.storages.coordinatordb.storage=jdbc
scalar.db.multi_storage.storages.coordinatordb.contact_points=jdbc:postgresql://postgres:5432/postgres
scalar.db.multi_storage.storages.coordinatordb.username=postgres
scalar.db.multi_storage.storages.coordinatordb.password=postgres
scalar.db.multi_storage.storages.coordinatordb.jdbc.connection_pool.max_total=25
scalar.db.multi_storage.storages.coordinatordb.jdbc.table_metadata.connection_pool.max_total=5

scalar.db.multi_storage.namespace_mapping=coordinator:coordinatordb
scalar.db.multi_storage.default_storage=cassandra

scalar.db.cluster.node.standalone_mode.enabled=true
scalar.db.cluster.node.transaction_participant.enabled=true
scalar.db.cluster.id=order-cluster
Both files map only coordinator and point default_storage at their own database, so the same two lines carry a different meaning in each.
namespace_mappinganddefault_storage: Onlycoordinatorneeds an explicit mapping. The application namespace falls through todefault_storage, which is this cluster's own database....coordinatordb.jdbc.connection_pool.max_total: Three ScalarDB components connect to the Coordinator database in this pattern, and the default pool sizes are meant for one. Left at their defaults, the pools exhaust a default PostgreSQLmax_connectionsand a node fails to start withFATAL: sorry, too many clients already.scalar.db.cluster.node.transaction_participant.enabled: Serves theTransactionParticipantservice, so the Transaction Coordinator can drive two-phase commit against this cluster, in addition to the ordinary transactions the cluster already serves. This is what makes a cluster a participant.scalar.db.cluster.id: The participant ID. It is required when the participant service is enabled, and must match the value in the corresponding service's properties and in the Transaction Coordinator's cluster list.
Transaction Coordinator
The Transaction Coordinator needs to know which clusters it coordinates and where to keep the Coordinator tables in transaction-coordinator.properties:
scalar.db.cluster.transaction_coordinator.standalone_mode.enabled=true

scalar.db.cluster.transaction_coordinator.clusters=customer-cluster,order-cluster
scalar.db.cluster.transaction_coordinator.clusters.customer-cluster.contact_points=indirect:customer-cluster
scalar.db.cluster.transaction_coordinator.clusters.customer-cluster.contact_port=60053
scalar.db.cluster.transaction_coordinator.clusters.order-cluster.contact_points=indirect:order-cluster
scalar.db.cluster.transaction_coordinator.clusters.order-cluster.contact_port=60053

scalar.db.storage=jdbc
scalar.db.contact_points=jdbc:postgresql://postgres:5432/postgres
scalar.db.username=postgres
scalar.db.password=postgres
scalar.db.jdbc.connection_pool.max_total=25
scalar.db.jdbc.table_metadata.connection_pool.max_total=5
scalar.db.cluster.transaction_coordinator.clusters: The participant clusters this coordinator drives, named by the IDs they set inscalar.db.cluster.id. Each one needs its owncontact_points, andcontact_portif it is not the default60053.scalar.db.storageandscalar.db.contact_points: The storage holding the Coordinator tables, configured with the standard storage settings rather than a coordinator-specific key. The Transaction Coordinator opens this connection when it starts and exits if it fails.
This sample sets only what it needs. For the full set of Transaction Coordinator settings, including ports, membership, and wire encryption, see Transaction Coordinator configurations.
The Transaction Coordinator settings live under scalar.db.cluster.transaction_coordinator., which is a different prefix from a cluster node's scalar.db.cluster.node.. In particular, standalone_mode.enabled exists under both prefixes and they are not interchangeable. The Transaction Coordinator image defaults its membership type to Kubernetes, so a coordinator that does not see its own standalone_mode key will try to reach the Kubernetes API instead of starting.
The Transaction Coordinator is not a licensed component and needs no license key.
Microservice configuration
This is where the two patterns actually differ. The application code is identical; only these properties change.
- Shared cluster
- Separated clusters
Both services connect to the same cluster node, and that node holds the transaction. No Transaction Coordinator is involved, so customer-service.properties and order-service.properties are identical:
scalar.db.transaction_manager=cluster
scalar.db.contact_points=indirect:scalardb-cluster-node
scalar.db.cluster.client.transaction_coordinator.enabled=false
transaction_coordinator.enabled=false is the default and could be omitted. It is written out so that the difference from the other pattern is visible in the file rather than only in its absence.
Each service connects to the cluster it owns, and both send transaction control to the same Transaction Coordinator. The two files therefore differ in two places—the cluster they contact and the ID they identify themselves by—and agree on everything else.
customer-service.properties:
scalar.db.transaction_manager=cluster
scalar.db.contact_points=indirect:customer-cluster
scalar.db.cluster.id=customer-cluster
scalar.db.cluster.client.transaction_coordinator.enabled=true
scalar.db.cluster.client.transaction_coordinator.contact_points=indirect:transaction-coordinator
scalar.db.cluster.client.transaction_coordinator.contact_port=60055
order-service.properties:
scalar.db.transaction_manager=cluster
scalar.db.contact_points=indirect:order-cluster
scalar.db.cluster.id=order-cluster
scalar.db.cluster.client.transaction_coordinator.enabled=true
scalar.db.cluster.client.transaction_coordinator.contact_points=indirect:transaction-coordinator
scalar.db.cluster.client.transaction_coordinator.contact_port=60055
The settings that this pattern adds are as follows.
scalar.db.cluster.id: The identifier of the cluster that this service belongs to. The Transaction Coordinator uses it to tell which participant a branch belongs to. The value must match the one set on the corresponding cluster node and must appear in the Transaction Coordinator'sscalar.db.cluster.transaction_coordinator.clusters. Those three places name the same participant.scalar.db.cluster.client.transaction_coordinator.enabled: Which backinggetGlobalTransactionManager()returns. Whenfalse, the transaction lives inside the single cluster the service is connected to. Whentrue, transaction control is routed to the Transaction Coordinator, which drives two-phase commit across the participant clusters. This one setting is what selects the deployment pattern. It has no effect ongetTransactionManager(), which always connects directly to the cluster the service is connected to, so the transactions that stay within one service run the same way in both patterns.scalar.db.cluster.client.transaction_coordinator.contact_points: Which Transaction Coordinator to send transaction control to. This uses the same format asscalar.db.contact_points:indirect:<HOST>to reach it through a single endpoint, ordirect-kubernetes:<NAMESPACE>/<ENDPOINT>to discover its nodes through the Kubernetes endpoint API.scalar.db.cluster.client.transaction_coordinator.contact_port: The port of the Transaction Coordinator. Its default is60055, which is not the same as a cluster node's60053.
scalar.db.cluster.id is required on the client as well as on the cluster node whenever the Transaction Coordinator is enabled and the service also connects to a cluster, as both services here do. Without it, the service fails at startup with DB-CLUSTER-10080.
Start the databases and ScalarDB Cluster
Start the infrastructure before the microservices, since each service connects to ScalarDB Cluster when it starts. The number of containers differs between the patterns.
- Shared cluster
- Separated clusters
Start MySQL, Cassandra, PostgreSQL, and one ScalarDB Cluster node:
docker compose up -d mysql cassandra postgres scalardb-cluster-node
The cluster node uses the multi-storage setting: MySQL holds the customer_service namespace, Cassandra holds order_service, and PostgreSQL holds the Coordinator tables. For details, see How to configure ScalarDB to support multi-storage transactions.
Start MySQL, Cassandra, PostgreSQL, both cluster nodes, and the Transaction Coordinator:
docker compose up -d mysql cassandra postgres customer-cluster order-cluster transaction-coordinator
PostgreSQL holds the Coordinator tables. The Transaction Coordinator opens that connection at startup and exits if it fails, so it waits for PostgreSQL to become healthy before starting.
Both cluster nodes connect to it as well, not just the Transaction Coordinator. When a read finds a record left behind by a transaction that did not finish, the cluster looks up that transaction's state in the Coordinator tables to decide whether to roll it forward or back. A participant that cannot reach those tables cannot recover such records. That is why each cluster node in this pattern uses multi-storage: its own database for its own namespace, and PostgreSQL for the coordinator namespace.
Starting the Docker containers may take more than one minute depending on your development environment.
Load the schema
The schema is defined in JSON files in the directory you selected. To apply it, go to the Releases of ScalarDB and download the ScalarDB Cluster Schema Loader (scalardb-cluster-schema-loader-<X.Y.Z>-all.jar) for the version of ScalarDB Cluster that you want to use.
Then run the following commands, replacing <X.Y.Z> with the version that you downloaded.
- Shared cluster
- Separated clusters
One cluster holds everything, so one run applies both services' tables and the Coordinator tables:
java -jar scalardb-cluster-schema-loader-<X.Y.Z>-all.jar \
  --config scalardb-cluster-node-client.properties \
  --schema-file schema.json --coordinator
The --coordinator option is required. The Coordinator tables cannot be declared in a JSON schema file.
Each cluster owns its own namespace, and the Transaction Coordinator owns the Coordinator tables in a separate database, so the schema is applied in three places:
java -jar scalardb-cluster-schema-loader-<X.Y.Z>-all.jar \
  --config customer-cluster-client.properties \
  --schema-file schema-for-customer-service.json

java -jar scalardb-cluster-schema-loader-<X.Y.Z>-all.jar \
  --config order-cluster-client.properties \
  --schema-file schema-for-order-service.json

java -jar scalardb-cluster-schema-loader-<X.Y.Z>-all.jar \
  --config tc-coordinator-storage.properties --coordinator
The third command talks to PostgreSQL directly rather than through a cluster, because the Transaction Coordinator serves transaction control, not schema administration.
Schema loading is one of the things that genuinely differs between the two patterns. The claim that only configuration changes is about the application code, not about the deployment as a whole.
Schema details
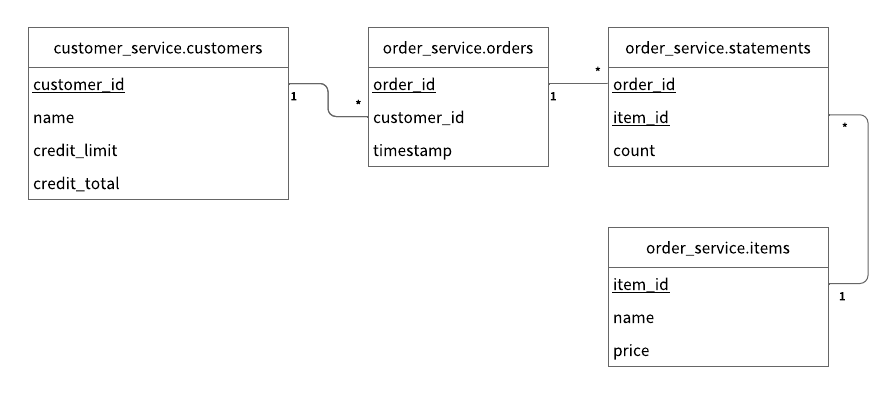
All the tables for the Customer Service are created in the customer_service namespace:
customer_service.customers: a table that manages customers' informationcredit_limit: the maximum amount of money a lender will allow each customer to spend when using a line of creditcredit_total: the amount of money that each customer has already spent by using their line of credit
All the tables for the Order Service are created in the order_service namespace:
order_service.orders: a table that manages order informationorder_service.statements: a table that manages order statement informationorder_service.items: a table that manages information of items to be ordered
The Entity Relationship Diagram for the schema is as follows:
Start the microservices
Build the Docker images for the two services and start them. The Gradle build is defined at the root of the sample, so -p .. points Gradle there while you stay in the directory for your pattern:
../gradlew -p .. :customer-service:docker :order-service:docker
docker compose up -d customer-service order-service
The images carry no configuration. Each pattern's docker-compose.yml mounts the properties file it needs, which is why the same image tag runs against both patterns. You can confirm that the images are the same across patterns:
docker image inspect --format '{{.Id}}' sample-mstx-order-service:1.0
Each service loads its own initial data when it starts, so there is no separate data-loading step. The Customer Service seeds three customers, and the Order Service seeds the five items that can be ordered.
Execute transactions and retrieve data in the sample application
The following sections describe how to execute transactions and retrieve data in the sample e-commerce application. The commands and their results are the same in both deployment patterns.
Run these commands from the sample's root directory:
cd ..
Get customer information
Start with getting information about the customer whose ID is 1 by running the following command:
./gradlew :client:run --args="GetCustomerInfo 1" -q
You should see the following output:
{
  "id": 1,
  "name": "Yamada Taro",
  "creditLimit": 10000
}
At this time, creditTotal isn't shown, which means the current value of creditTotal is 0.
Place an order
Then, have customer ID 1 place an order for two apples and one orange by running the following command:
The order format in this command is ./gradlew :client:run --args="PlaceOrder <CUSTOMER_ID> <ITEM_ID>:<COUNT>,<ITEM_ID>:<COUNT>,...".
./gradlew :client:run --args="PlaceOrder 1 1:2,2:1" -q
You should see a similar output as below, with a different UUID for orderId, which confirms that the order was successful:
{
  "orderId": "bcb15594-9a0a-449e-ba20-e1dfed9e6e1e"
}
This single command ran a transaction across both services: the Order Service wrote the order and its statements, and the Customer Service charged the customer's line of credit. Either both happened or neither did.
Check the order details
Check details about the order by running the following command, replacing <ORDER_ID_UUID> with the UUID for the orderId that was shown after running the previous command:
./gradlew :client:run --args="GetOrder <ORDER_ID_UUID>" -q
You should see a similar output as below, with a different UUID for orderId and a different value for timestamp:
{
  "order": {
    "orderId": "bcb15594-9a0a-449e-ba20-e1dfed9e6e1e",
    "timestamp": "1788401092031",
    "customerId": 1,
    "customerName": "Yamada Taro",
    "statement": [{
      "itemId": 1,
      "itemName": "Apple",
      "price": 1000,
      "count": 2,
      "total": 2000
    }, {
      "itemId": 2,
      "itemName": "Orange",
      "price": 2000,
      "count": 1,
      "total": 2000
    }],
    "total": 4000
  }
}
customerName comes from the Customer Service. This is a read-only transaction—the Order Service began it with beginReadOnly()—that still spans both services.
Check the credit total
Check the customer's credit total by running the following command:
./gradlew :client:run --args="GetCustomerInfo 1" -q
You should see the following output, which shows that customer ID 1 has used 4000 of their credit:
{
  "id": 1,
  "name": "Yamada Taro",
  "creditLimit": 10000,
  "creditTotal": 4000
}
See a transaction roll back
Now try an order that exceeds the customer's remaining credit. With 4000 already spent against a limit of 10000, three melons at 3000 each would come to 9000:
./gradlew :client:run --args="PlaceOrder 1 5:3" -q
The command fails with FAILED_PRECONDITION: Credit limit exceeded. Check both services afterwards:
./gradlew :client:run --args="GetCustomerInfo 1" -q
./gradlew :client:run --args="GetOrders 1" -q
creditTotal is still 4000 and no new order appears. The Customer Service rejected the payment, and the Order Service's write of the order was rolled back with it, even though that write had already succeeded on its own branch. Neither service implemented any of that.
Make a payment
Make a payment by running the following command:
./gradlew :client:run --args="Repayment 1 1000" -q
Then check the credit total again:
./gradlew :client:run --args="GetCustomerInfo 1" -q
You should see that creditTotal has been reduced to 3000. This transaction involves only the Customer Service, so it runs as an ordinary transaction through the Transaction API rather than as a microservice transaction.
Stop the sample application
To stop the sample application, go back to the directory for the pattern you selected and stop the containers:
- Shared cluster
- Separated clusters
cd shared-cluster/
docker compose down -v
cd separated-clusters/
docker compose down -v
If you want to try the other deployment pattern, stop the current one as shown above before starting the other one. The two patterns use the same container names and host ports, and Docker Compose treats the two directories as separate projects, so it will not stop the other pattern's containers for you.