Getting Started with ScalarDB MCP Server
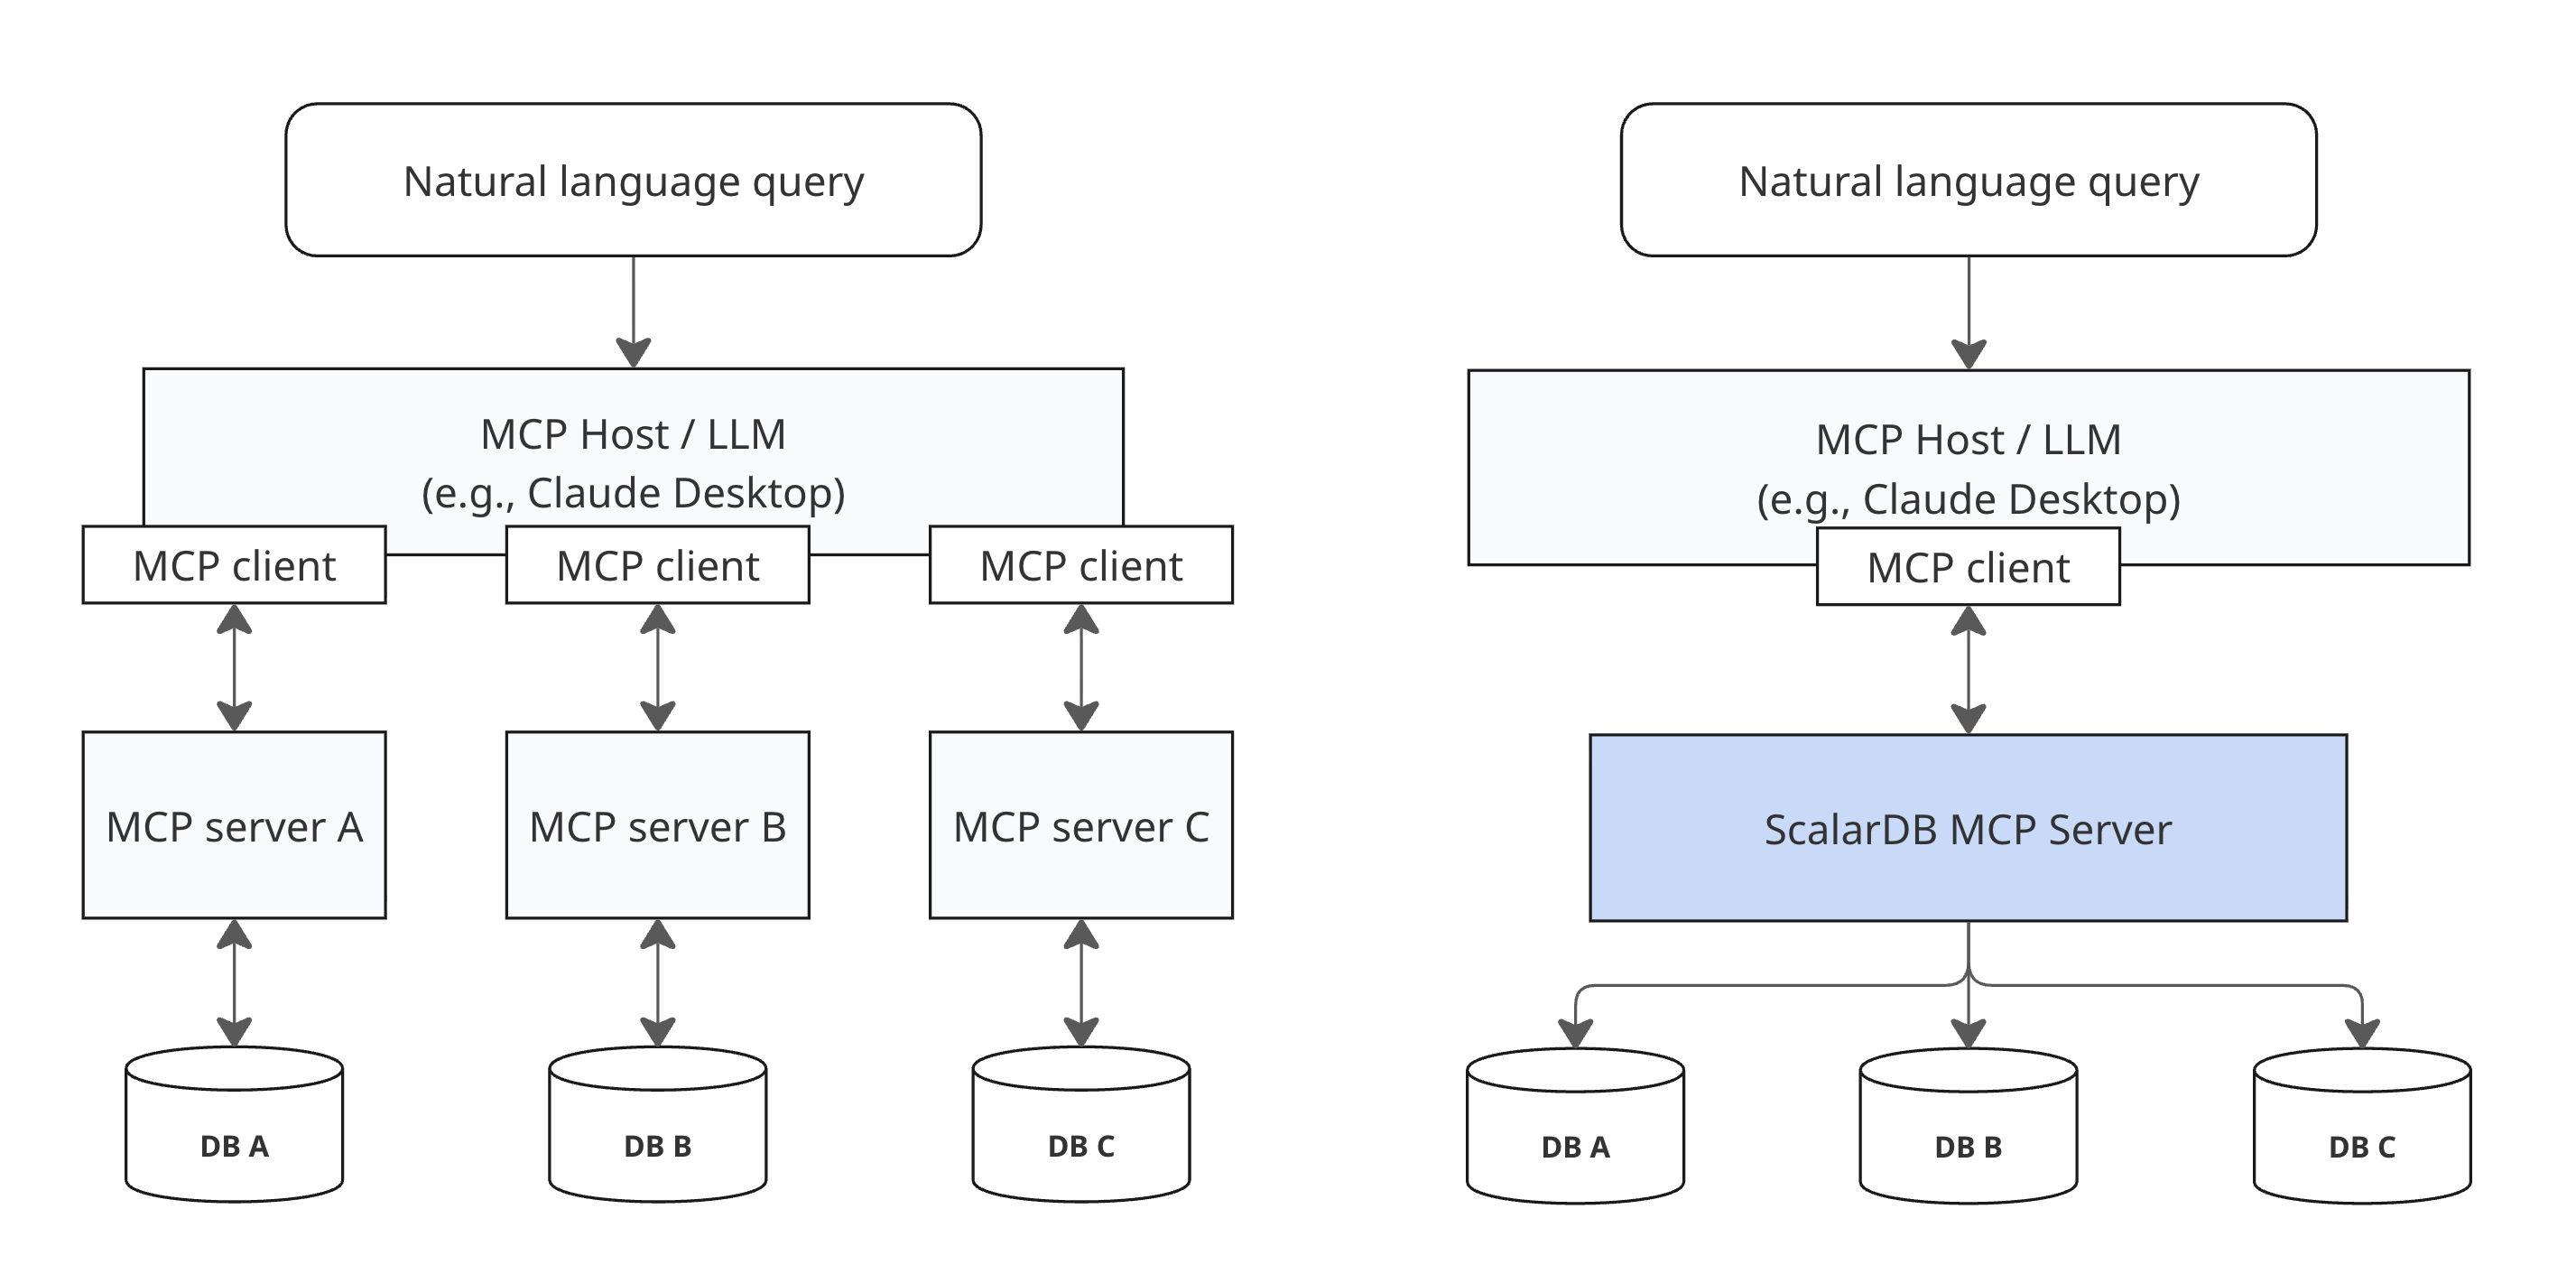
ScalarDB MCP Server is a Model Context Protocol (MCP) implementation that enables LLMs to access and manage your data through ScalarDB. By leveraging LLMs, you can use natural language to search and update across multiple, potentially siloed, databases.
ScalarDB MCP Server works with both single and multiple storage configurations. Unlike traditional approaches that require separate MCP servers for each database, ScalarDB MCP Server takes advantage of the multi-storage capabilities of ScalarDB to provide unified access to heterogeneous databases (PostgreSQL, MySQL, Cosmos DB, DynamoDB, etc.) through a single MCP server. By simply submitting queries in natural language, the server automatically executes the appropriate operations across your databases, improving and accelerating decision-making processes.
Architecture and key features
The following diagram shows how ScalarDB MCP Server differs from traditional approaches. Instead of requiring separate MCP servers for each database, you connect once to ScalarDB MCP Server to access all your databases through ScalarDB.
At its core, ScalarDB MCP Server provides the following capabilities.
ScalarDB connectivity
The MCP server internally uses the ScalarDB Core library or connects to your ScalarDB Cluster through the client library, depending on settings. This means users don't need to know how to use the libraries to interact with ScalarDB.
Transactional operations
ScalarDB MCP Server supports ACID-compliant transactions, allowing an LLM to execute multiple operations safely. When the LLM determines that operations should be grouped together, the MCP server ensures the operations either all succeed or all fail together, maintaining data integrity across your databases.
Operational mode
ScalarDB MCP Server supports two operational modes that match your ScalarDB component: SQL mode and CRUD mode.
SQL mode
SQL mode with ScalarDB Cluster provides a SQL interface for database operations. When you make natural language requests, the LLM automatically generates and executes SQL commands through the supported SQL operations in ScalarDB and handles transactions by using standard SQL syntax (BEGIN, COMMIT, ROLLBACK). This mode could be more efficient because the LLM only needs to use one tool to perform all operations. SQL mode is available only with ScalarDB Cluster.
CRUD mode
CRUD mode is used when you want programmatic control over your operations. Since ScalarDB Core doesn't include the SQL interface, this mode uses the native SDK operations in ScalarDB instead. The LLM converts your natural language requests into appropriate SDK calls by using individual tools for schema management, CRUD operations, and explicit transaction control. This mode could be less efficient because the LLM has to work with multiple tools to complete operations.
Deployment limitations
The ScalarDB MCP Server currently runs in STDIO mode for local deployment only. Remote server deployment via Server-Sent Events (SSE) is not yet supported but is planned for future releases.
What this means:
- ✅ The MCP server runs locally alongside your AI client (Claude Desktop, Visual Studio Code, etc.).
- ✅ Perfect for development, testing, and single-user scenarios.
- ❌ Cannot deploy the MCP server on remote servers for multi-user access.
- ❌ No web-based or cloud deployment options yet.
Example workflow
Here's how you interact with ScalarDB MCP Server through natural language:
Querying data (SQL mode):
You: "Show me all users from the customer table"
🤖 LLM automatically uses: scalardb_execute_sql tool
SQL generated: SELECT * FROM customer
Result: Customer data displayed with columns and values
Querying data (CRUD mode):
You: "Show me all users from the customer table"
🤖 LLM automatically uses: scalardb_scan tool
Result: Customer data displayed with columns and values
Creating database structures (CRUD mode):
You: "Create a new table called products with columns id, name, and price"
🤖 LLM automatically uses: scalardb_create_table tool
Result: ✅ Table 'products' created successfully
Cross-database operations (multi-storage):
You: "Get user profile and order history for user ID 123"
🤖 LLM automatically uses: scalardb_get tool (queries across multiple databases)
Result: Combined user profile (from PostgreSQL) and order history (from DynamoDB)
The LLM automatically selects the appropriate tools based on your request—you don't need to know which specific tools exist or how to use them.
Tutorial
The following configuration samples use the same Cassandra and MySQL multi-storage configuration as the Multi-Storage Transaction Sample. You can follow that hands-on tutorial to set up your databases, then use the same setup to test the MCP server with this tutorial.
Configurations may vary depending on your specific MCP client and database environment. Refer to your MCP client's documentation for detailed setup instructions on how to add a connection to an MCP server.
Setup
Follow these steps to set up ScalarDB MCP Server.
Prerequisites
Ensure you have the following:
- (For JAR distribution) One of the following Java Development Kits (JDKs):
- Oracle JDK: 17 or 21 (LTS versions)
- OpenJDK distribution (Eclipse Temurin, Amazon Corretto, or Microsoft Build of OpenJDK): 17 or 21 (LTS versions)
- (For Docker distribution) Docker 20.10 or later
- (For this tutorial's examples) Cassandra and MySQL databases must be running
- (For SQL mode) ScalarDB Cluster must also be running
- MCP-compatible client (Claude Desktop, Visual Studio Code with Cline, etc.)
Step 1: Choose your MCP client type
Select the configuration method that matches your MCP client. If you're using the Claude Code CLI or similar tools that support command-line MCP server management, choose CLI tools. If you're using Claude Desktop or other clients that require manual JSON configuration files, choose Manual configuration files.
- CLI tools (Claude Code, etc.)
- Manual configuration files (Claude Desktop, etc.)
For MCP clients with command-line server management (for example, the Claude Code CLI).
Step 2: Choose your distribution method
- Docker (recommended)
- JAR
Docker images are available from the ScalarDB MCP Server container registry.
You can pull the Docker image from the container registry by running the following command. Be sure to replace <VERSION> with the version that you want to use.
docker pull ghcr.io/scalar-labs/scalardb-mcp-server:<VERSION>
Step 3: Choose your ScalarDB deployment type
- ScalarDB Cluster
- ScalarDB Core
Run the following command to add the MCP server:
claude mcp add scalardb -- docker run --rm -i \
  --name scalardb-mcp-server \
  ghcr.io/scalar-labs/scalardb-mcp-server:<VERSION> \
  --scalar.mcp.db.server.tool.mode=SQL \
  --scalar.db.transaction_manager=cluster \
  --scalar.db.contact_points=indirect:host.docker.internal \
  --scalar.db.contact_port=60053
This configuration uses SQL mode, which is recommended for ScalarDB Cluster as it provides a more efficient single-tool approach.
ScalarDB Cluster configuration
The configuration above shows how the MCP server connects to ScalarDB Cluster as a client. The ScalarDB Cluster itself must be separately configured.
For example, your ScalarDB Cluster configuration with multi-storage support would include:
scalar.db.transaction_manager=consensus-commit
scalar.db.storage=multi-storage
scalar.db.multi_storage.storages=cassandra,mysql
scalar.db.multi_storage.storages.cassandra.storage=cassandra
scalar.db.multi_storage.storages.cassandra.contact_points=localhost
scalar.db.multi_storage.storages.cassandra.username=cassandra
scalar.db.multi_storage.storages.cassandra.password=cassandra
scalar.db.multi_storage.storages.mysql.storage=jdbc
scalar.db.multi_storage.storages.mysql.contact_points=jdbc:mysql://localhost:3306/
scalar.db.multi_storage.storages.mysql.username=root
scalar.db.multi_storage.storages.mysql.password=mysql
scalar.db.multi_storage.namespace_mapping=customer:mysql,order:cassandra,coordinator:cassandra
scalar.db.multi_storage.default_storage=cassandra

scalar.db.sql.enabled=true

# License key configurations
scalar.db.cluster.node.licensing.license_key=
scalar.db.cluster.node.licensing.license_check_cert_pem=
For complete ScalarDB Cluster deployment and configuration instructions, see ScalarDB Cluster Configurations. For a hands-on setup guide with multi-storage, see the Multi-Storage Transaction Sample.
Docker flags:
--rm: Required to automatically remove the container after the MCP client disconnects--name: Required to prevent dangling container instances from accumulating
Run the following command to add the MCP server:
claude mcp add scalardb -- docker run --rm -i \
  --name scalardb-mcp-server \
  ghcr.io/scalar-labs/scalardb-mcp-server:<VERSION> \
  --scalar.mcp.db.server.tool.mode=CRUD \
  --scalar.db.transaction_manager=consensus-commit \
  --scalar.db.storage=multi-storage \
  --scalar.db.multi_storage.storages=cassandra,mysql \
  --scalar.db.multi_storage.storages.cassandra.storage=cassandra \
  --scalar.db.multi_storage.storages.cassandra.contact_points=host.docker.internal \
  --scalar.db.multi_storage.storages.cassandra.username=cassandra \
  --scalar.db.multi_storage.storages.cassandra.password=cassandra \
  --scalar.db.multi_storage.storages.mysql.storage=jdbc \
  --scalar.db.multi_storage.storages.mysql.contact_points=jdbc:mysql://host.docker.internal:3306/ \
  --scalar.db.multi_storage.storages.mysql.username=root \
  --scalar.db.multi_storage.storages.mysql.password=mysql \
  --scalar.db.multi_storage.namespace_mapping=customer:mysql,order:cassandra,coordinator:cassandra \
  --scalar.db.multi_storage.default_storage=cassandra
This configuration uses CRUD mode, which is required for ScalarDB Core as it doesn't include the SQL interface.
The example above demonstrates a multi-storage configuration. For other ScalarDB Core configuration options, see ScalarDB Configurations.
Docker flags:
--rm: Required to automatically remove the container after the MCP client disconnects--name: Required to prevent dangling container instances from accumulating
Download the latest JAR file from the ScalarDB MCP Server releases page.
Step 3: Choose your ScalarDB deployment type
- ScalarDB Cluster
- ScalarDB Core
Run the following command to add the MCP server:
claude mcp add scalardb \
  -- java -jar /path/to/scalardb-mcp-server-<VERSION>.jar \
  --scalar.mcp.db.server.tool.mode=SQL \
  --scalar.db.transaction_manager=cluster \
  --scalar.db.contact_points=indirect:localhost \
  --scalar.db.contact_port=60053
This configuration uses SQL mode, which is recommended for ScalarDB Cluster as it provides a more efficient single-tool approach.
ScalarDB Cluster configuration
The configuration above shows how the MCP server connects to ScalarDB Cluster as a client. The ScalarDB Cluster itself must be separately configured.
For example, your ScalarDB Cluster configuration with multi-storage support would include:
scalar.db.transaction_manager=consensus-commit
scalar.db.storage=multi-storage
scalar.db.multi_storage.storages=cassandra,mysql
scalar.db.multi_storage.storages.cassandra.storage=cassandra
scalar.db.multi_storage.storages.cassandra.contact_points=localhost
scalar.db.multi_storage.storages.cassandra.username=cassandra
scalar.db.multi_storage.storages.cassandra.password=cassandra
scalar.db.multi_storage.storages.mysql.storage=jdbc
scalar.db.multi_storage.storages.mysql.contact_points=jdbc:mysql://localhost:3306/
scalar.db.multi_storage.storages.mysql.username=root
scalar.db.multi_storage.storages.mysql.password=mysql
scalar.db.multi_storage.namespace_mapping=customer:mysql,order:cassandra,coordinator:cassandra
scalar.db.multi_storage.default_storage=cassandra

scalar.db.sql.enabled=true

# License key configurations
scalar.db.cluster.node.licensing.license_key=
scalar.db.cluster.node.licensing.license_check_cert_pem=
For complete ScalarDB Cluster deployment and configuration instructions, see ScalarDB Cluster Configurations. For a hands-on setup guide with multi-storage, see the Multi-Storage Transaction Sample.
Run the following command to add the MCP server:
claude mcp add scalardb \
  -- java -jar /path/to/scalardb-mcp-server-<VERSION>.jar \
  --scalar.mcp.db.server.tool.mode=CRUD \
  --scalar.db.transaction_manager=consensus-commit \
  --scalar.db.storage=multi-storage \
  --scalar.db.multi_storage.storages=cassandra,mysql \
  --scalar.db.multi_storage.storages.cassandra.storage=cassandra \
  --scalar.db.multi_storage.storages.cassandra.contact_points=localhost \
  --scalar.db.multi_storage.storages.cassandra.username=cassandra \
  --scalar.db.multi_storage.storages.cassandra.password=cassandra \
  --scalar.db.multi_storage.storages.mysql.storage=jdbc \
  --scalar.db.multi_storage.storages.mysql.contact_points=jdbc:mysql://localhost:3306/ \
  --scalar.db.multi_storage.storages.mysql.username=root \
  --scalar.db.multi_storage.storages.mysql.password=mysql \
  --scalar.db.multi_storage.namespace_mapping=customer:mysql,order:cassandra,coordinator:cassandra \
  --scalar.db.multi_storage.default_storage=cassandra
This configuration uses CRUD mode, which is required for ScalarDB Core as it doesn't include the SQL interface.
The example above demonstrates a multi-storage configuration. For other ScalarDB Core configuration options, see ScalarDB Configurations.
The examples below use the configuration format for Claude Desktop, but most MCP clients use the same JSON structure. Refer to your specific client's documentation for the exact configuration file location.
Step 2: Choose your distribution method
- Docker (recommended)
- JAR
Docker images are available from the ScalarDB MCP Server container registry.
You can pull the Docker image from the container registry by running the following command. Be sure to replace <VERSION> with the version that you want to use.
docker pull ghcr.io/scalar-labs/scalardb-mcp-server:<VERSION>
Step 3: Choose your ScalarDB deployment type
- ScalarDB Cluster
- ScalarDB Core
Add the following to your MCP client configuration file:
{
  "mcpServers": {
    "scalardb": {
      "command": "docker",
      "args": [
        "run",
        "-i",
        "--rm",
        "--name", "scalardb-mcp-server",
        "ghcr.io/scalar-labs/scalardb-mcp-server:<VERSION>",
        "--scalar.db.transaction_manager=cluster",
        "--scalar.db.contact_points=indirect:host.docker.internal",
        "--scalar.db.contact_port=60053",
        "--scalar.mcp.db.server.tool.mode=SQL"
      ]
    }
  }
}
This configuration uses SQL mode, which is recommended for ScalarDB Cluster as it provides a more efficient single-tool approach.
ScalarDB Cluster configuration
The configuration above shows how the MCP server connects to ScalarDB Cluster as a client. The ScalarDB Cluster itself must be separately configured.
For example, your ScalarDB Cluster configuration with multi-storage support would include:
scalar.db.transaction_manager=consensus-commit
scalar.db.storage=multi-storage
scalar.db.multi_storage.storages=cassandra,mysql
scalar.db.multi_storage.storages.cassandra.storage=cassandra
scalar.db.multi_storage.storages.cassandra.contact_points=localhost
scalar.db.multi_storage.storages.cassandra.username=cassandra
scalar.db.multi_storage.storages.cassandra.password=cassandra
scalar.db.multi_storage.storages.mysql.storage=jdbc
scalar.db.multi_storage.storages.mysql.contact_points=jdbc:mysql://localhost:3306/
scalar.db.multi_storage.storages.mysql.username=root
scalar.db.multi_storage.storages.mysql.password=mysql
scalar.db.multi_storage.namespace_mapping=customer:mysql,order:cassandra,coordinator:cassandra
scalar.db.multi_storage.default_storage=cassandra

scalar.db.sql.enabled=true

# License key configurations
scalar.db.cluster.node.licensing.license_key=
scalar.db.cluster.node.licensing.license_check_cert_pem=
For complete ScalarDB Cluster deployment and configuration instructions, see ScalarDB Cluster Configurations. For a hands-on setup guide with multi-storage, see the Multi-Storage Transaction Sample.
Docker flags
--rm: Required to automatically remove the container after the MCP client disconnects--name: Required to prevent dangling container instances from accumulating
Add the following to your MCP client configuration file:
{
  "mcpServers": {
    "scalardb": {
      "command": "docker",
      "args": [
        "run",
        "-i",
        "--rm",
        "--name", "scalardb-mcp-server",
        "ghcr.io/scalar-labs/scalardb-mcp-server:<VERSION>",
        "--scalar.mcp.db.server.tool.mode=CRUD",
        "--scalar.db.transaction_manager=consensus-commit",
        "--scalar.db.storage=multi-storage",
        "--scalar.db.multi_storage.storages=cassandra,mysql",
        "--scalar.db.multi_storage.storages.cassandra.storage=cassandra",
        "--scalar.db.multi_storage.storages.cassandra.contact_points=host.docker.internal",
        "--scalar.db.multi_storage.storages.cassandra.username=cassandra",
        "--scalar.db.multi_storage.storages.cassandra.password=cassandra",
        "--scalar.db.multi_storage.storages.mysql.storage=jdbc",
        "--scalar.db.multi_storage.storages.mysql.contact_points=jdbc:mysql://host.docker.internal:3306/",
        "--scalar.db.multi_storage.storages.mysql.username=root",
        "--scalar.db.multi_storage.storages.mysql.password=mysql",
        "--scalar.db.multi_storage.namespace_mapping=customer:mysql,order:cassandra,coordinator:cassandra",
        "--scalar.db.multi_storage.default_storage=cassandra"
      ]
    }
  }
}
This configuration uses CRUD mode, which is required for ScalarDB Core as it doesn't include the SQL interface.
The example above demonstrates a multi-storage configuration. For other ScalarDB Core configuration options, see ScalarDB Configurations.
Docker flags
--rm: Required to automatically remove the container after the MCP client disconnects--name: Required to prevent dangling container instances from accumulating
Download the latest JAR file from the ScalarDB MCP Server releases page.
Step 3: Choose your ScalarDB deployment type
- ScalarDB Cluster
- ScalarDB Core
Add the following to your MCP client configuration file:
{
  "mcpServers": {
    "scalardb": {
      "command": "java",
      "args": [
        "-jar",
        "/path/to/scalardb-mcp-server-<VERSION>.jar",
        "--scalar.mcp.db.server.tool.mode=SQL",
        "--scalar.db.transaction_manager=cluster",
        "--scalar.db.contact_points=indirect:localhost",
        "--scalar.db.contact_port=60053"
      ],
    }
  }
}
This configuration uses SQL mode, which is recommended for ScalarDB Cluster as it provides a more efficient single-tool approach.
ScalarDB Cluster configuration
The configuration above shows how the MCP server connects to ScalarDB Cluster as a client. The ScalarDB Cluster itself must be separately configured.
For example, your ScalarDB Cluster configuration with multi-storage support would include:
scalar.db.transaction_manager=consensus-commit
scalar.db.storage=multi-storage
scalar.db.multi_storage.storages=cassandra,mysql
scalar.db.multi_storage.storages.cassandra.storage=cassandra
scalar.db.multi_storage.storages.cassandra.contact_points=localhost
scalar.db.multi_storage.storages.cassandra.username=cassandra
scalar.db.multi_storage.storages.cassandra.password=cassandra
scalar.db.multi_storage.storages.mysql.storage=jdbc
scalar.db.multi_storage.storages.mysql.contact_points=jdbc:mysql://localhost:3306/
scalar.db.multi_storage.storages.mysql.username=root
scalar.db.multi_storage.storages.mysql.password=mysql
scalar.db.multi_storage.namespace_mapping=customer:mysql,order:cassandra,coordinator:cassandra
scalar.db.multi_storage.default_storage=cassandra

scalar.db.sql.enabled=true

# License key configurations
scalar.db.cluster.node.licensing.license_key=
scalar.db.cluster.node.licensing.license_check_cert_pem=
For complete ScalarDB Cluster deployment and configuration instructions, see ScalarDB Cluster Configurations. For a hands-on setup guide with multi-storage, see the Multi-Storage Transaction Sample.
Add the following to your MCP client configuration file:
{
  "mcpServers": {
    "scalardb": {
      "command": "java",
      "args": [
        "-jar",
        "/path/to/scalardb-mcp-server-<VERSION>.jar",
        "--scalar.mcp.db.server.tool.mode=CRUD",
        "--scalar.db.transaction_manager=consensus-commit",
        "--scalar.db.storage=multi-storage",
        "--scalar.db.multi_storage.storages=cassandra,mysql",
        "--scalar.db.multi_storage.storages.cassandra.storage=cassandra",
        "--scalar.db.multi_storage.storages.cassandra.contact_points=localhost",
        "--scalar.db.multi_storage.storages.cassandra.username=cassandra",
        "--scalar.db.multi_storage.storages.cassandra.password=cassandra",
        "--scalar.db.multi_storage.storages.mysql.storage=jdbc",
        "--scalar.db.multi_storage.storages.mysql.contact_points=jdbc:mysql://localhost:3306/",
        "--scalar.db.multi_storage.storages.mysql.username=root",
        "--scalar.db.multi_storage.storages.mysql.password=mysql",
        "--scalar.db.multi_storage.namespace_mapping=customer:mysql,order:cassandra,coordinator:cassandra",
        "--scalar.db.multi_storage.default_storage=cassandra"
      ]
    }
  }
}
This configuration uses CRUD mode, which is required for ScalarDB Core as it doesn't include the SQL interface.
The example above demonstrates a multi-storage configuration. For other ScalarDB Core configuration options, see ScalarDB Configurations.
ScalarDB MCP Server configuration
Configure the MCP server by providing command-line arguments with lowercase dot notations when starting the server.
ScalarDB MCP Server–specific configuration
These properties control how the ScalarDB MCP server operates:
scalar.mcp.db.server.tool.mode
- Property:
scalar.mcp.db.server.tool.mode - Description: Tool availability mode.
- Default value:
CRUD - Options:
SQL,CRUD
scalar.mcp.db.server.connection.health_check_interval_seconds
- Property:
scalar.mcp.db.server.connection.health_check_interval_seconds - Description: Health check interval in seconds.
- Default value:
30 - Options: Any positive integer value
scalar.mcp.db.server.logging.file.name
- Property:
scalar.mcp.db.server.logging.file.name - Description: Enable file logging by specifying a log file path.
- Default value: No file logging
- Example:
scalardb-mcp-server.log
scalar.mcp.db.server.logging.level
- Property:
scalar.mcp.db.server.logging.level - Description: Set the logger level for the MCP server.
- Default value:
INFO - Options:
TRACE,DEBUG,INFO,WARN,ERROR
ScalarDB connection configuration
The MCP server uses ScalarDB client configuration properties to connect to your ScalarDB deployment (either ScalarDB Cluster or ScalarDB Core). These properties are passed as command-line arguments with lowercase dot notations. See the setup examples above for complete configuration examples for both connection types.
Available tools
The ScalarDB MCP Server provides comprehensive database operations through specialized MCP tools. The LLM automatically selects and uses the appropriate tools based on your natural language requests.
For complete tool documentation including all available operations, parameters, and examples, see the ScalarDB MCP Server Tools Reference.
ScalarDB version compatibility
| ScalarDB MCP Server | ScalarDB Core | ScalarDB Cluster | Java Version | Notes |
|---|---|---|---|---|
| 0.9.x | 3.16+ | 3.16+ | 17+ | Initial release |